| Rw ui layout macro |
|---|
FAQs
FAQs
| Status | ||||||
|---|---|---|---|---|---|---|
|
| Expand | ||
|---|---|---|
| ||
Buy is used for the purchase processes, focused on increasing yield with more agility in your processes, with gains of up to 42% for your company. With Buy, it is possible to:
|
| Expand | ||
|---|---|---|
|
To check the orders received by your company, navigate to Buy > Orders Received: It is possible to identify in the home panel New Orders Waiting to be Accepted, Updated Orders Waiting to be Aceepted and Orders Accepted.
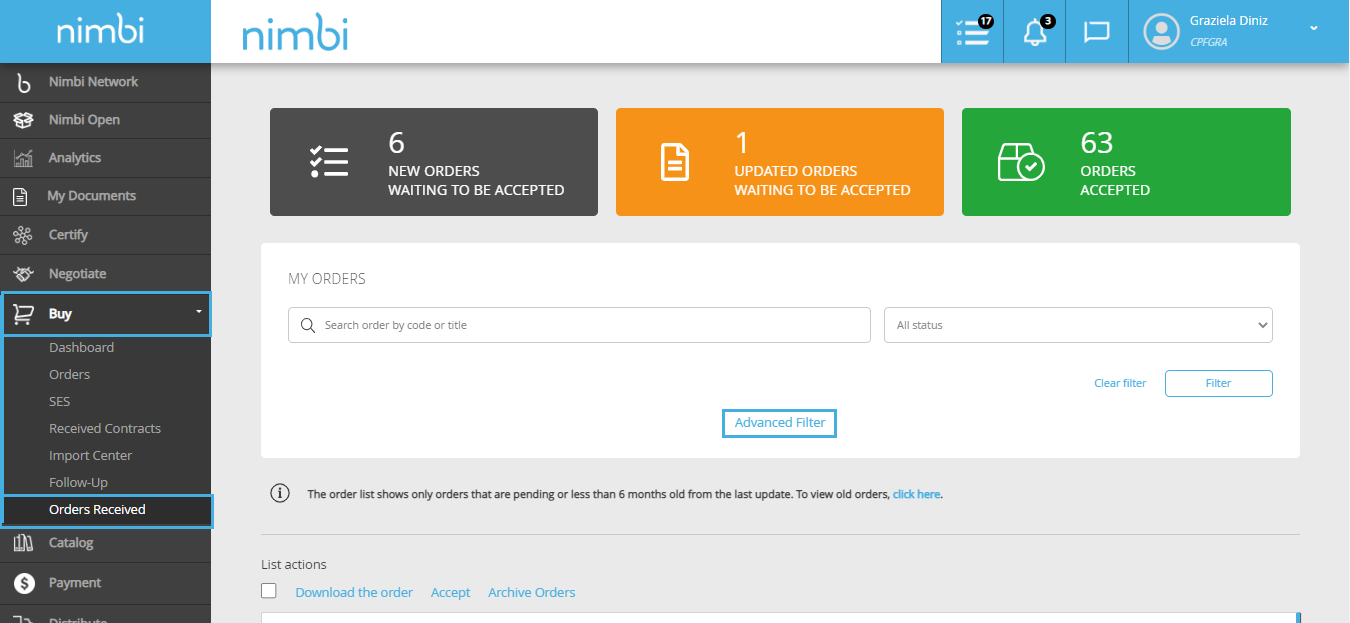 It is also possible to locate orders through the notification received by email or by navigating to Buy > Orders; Just below, you will find the orders available in a list and if you want to Download the orders, select it through the selection box and click on Download the Order. 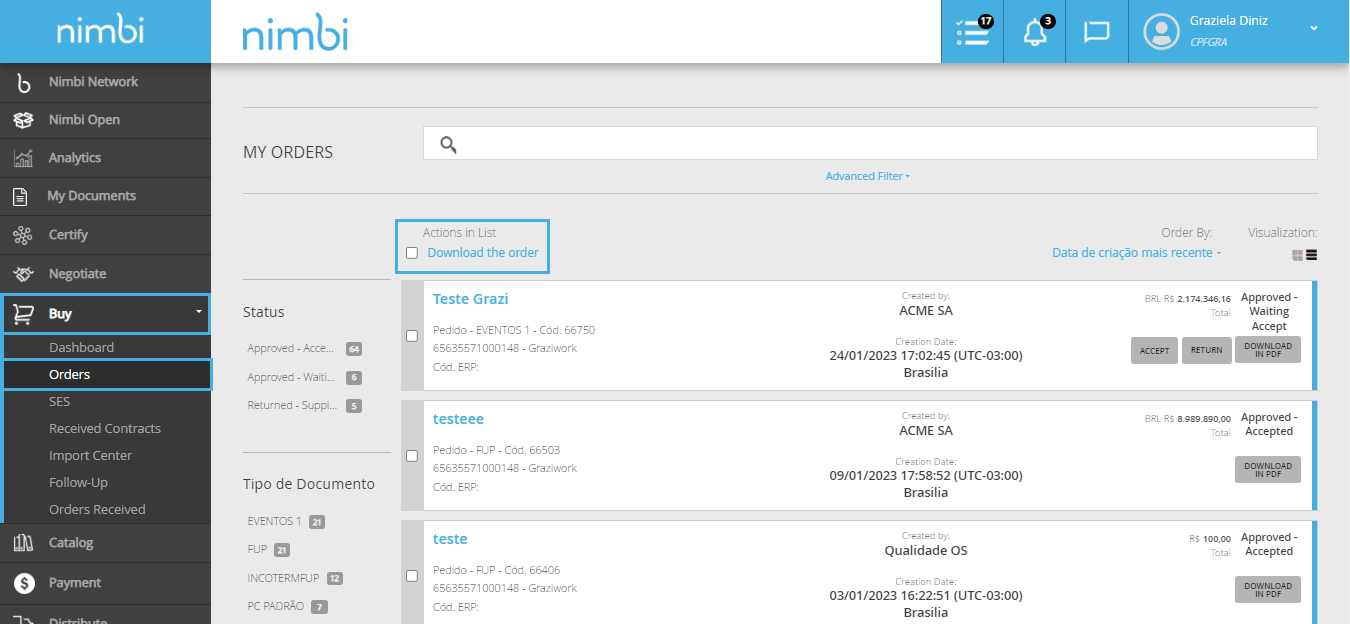
 In the Fup Details panel, you will be able to view the entire progress of the order. 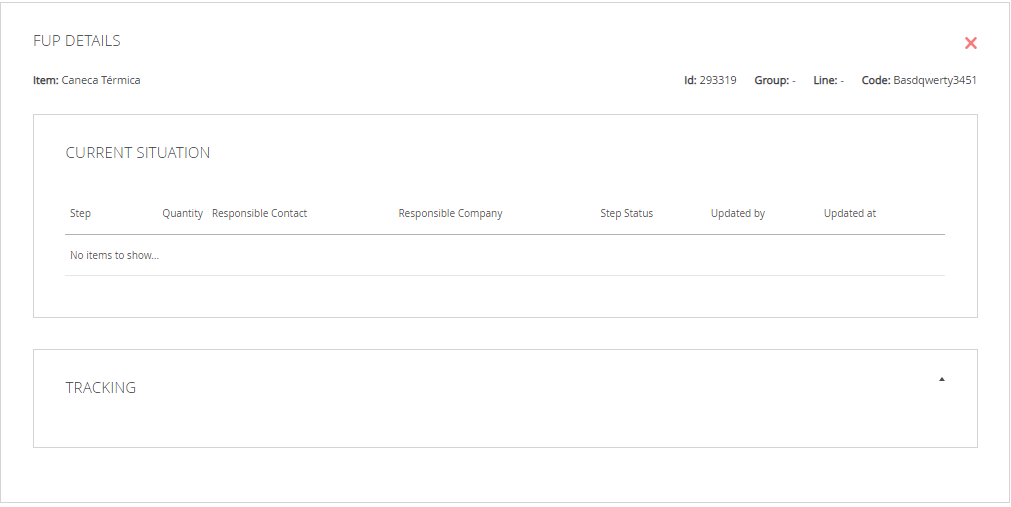 |
| Expand | ||
|---|---|---|
| ||
|
| Expand | ||
|---|---|---|
| ||
Navegate to Buy > Orders, Locate and click on the desired Order 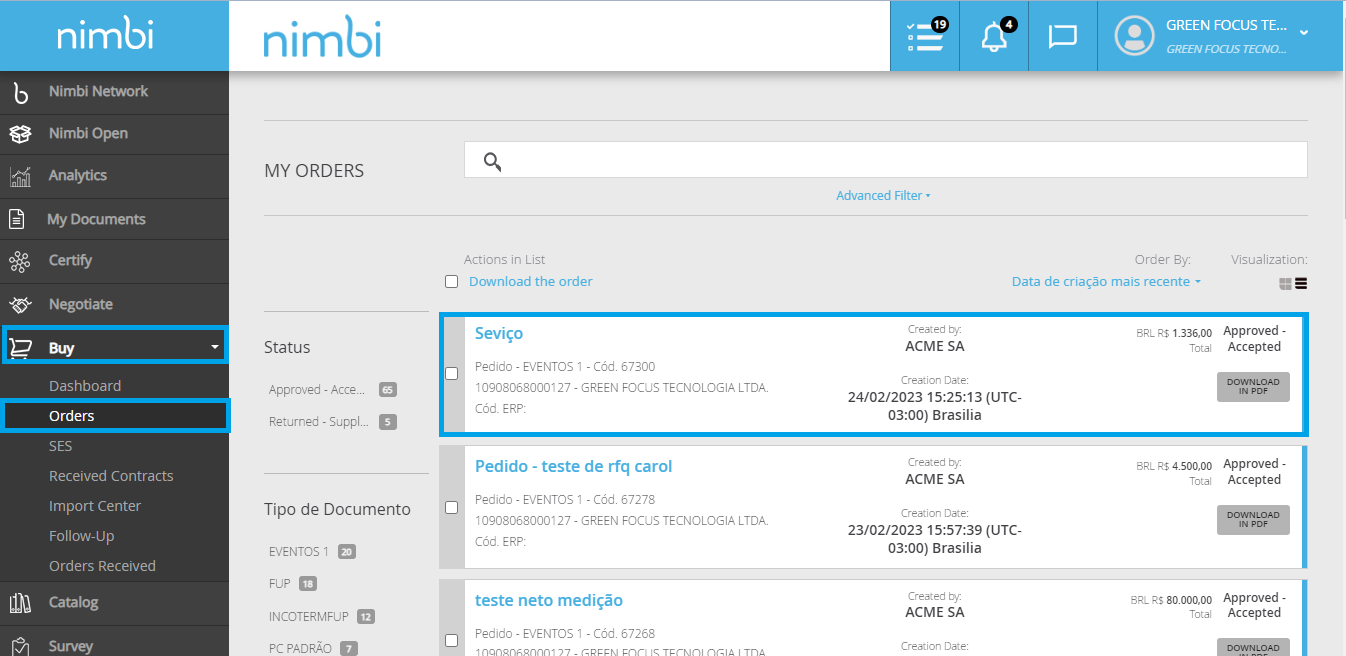 In the View order panel, details of the order will be displayed, so that it is possible to analyze and define whether to accept it or not. After reviewing all required information, click Accept or Reject. 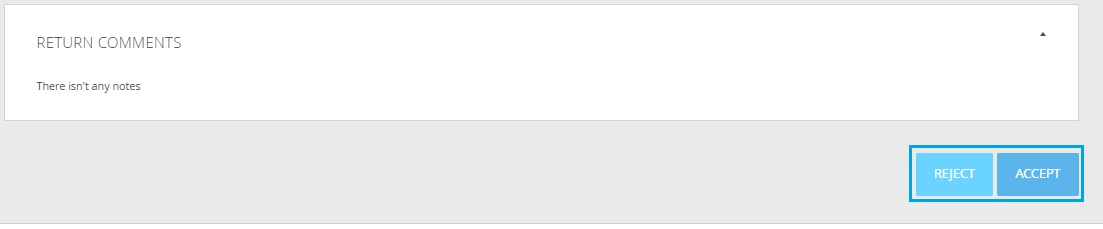 If you wish, you can accept your orders at Buy > Received Orders; It is possible to identify in the initial panel New Orders Waiting to be Accepted, Updated Orders Waiting to be Accepted and Orders Accepted. 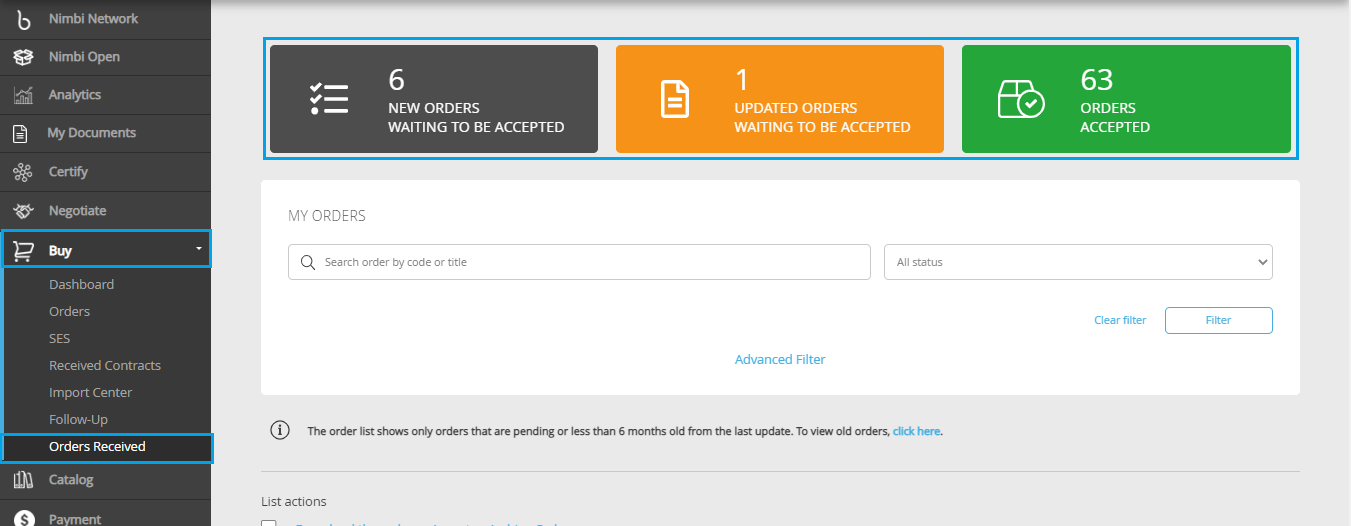 Just below, you will find the orders available in a list and if you want to download the orders, select the same through the checkbox and click Download Order. 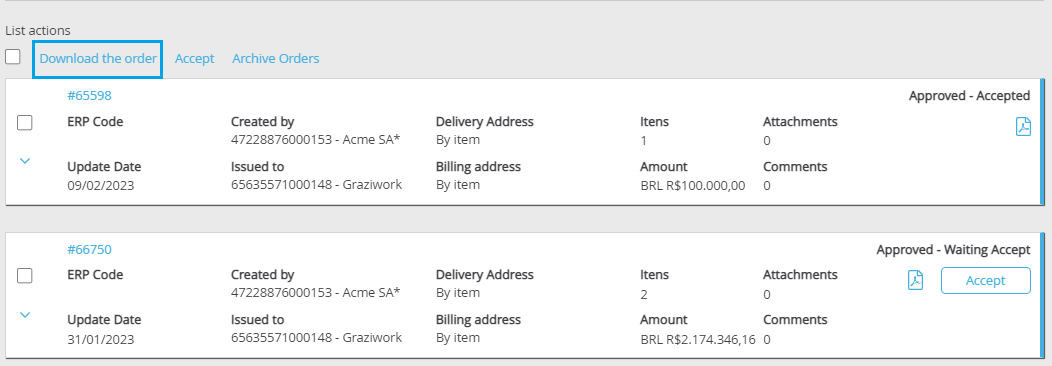 When trying to accept the order, if it is an order with Follow-up, go to the Items panel > Select the Follow-up option Select the desired order > click on the Finish Step link to complete the acceptance step.  Note: If you want to return, after clicking on the respective button, you must inform the reason for the return and include a comment. Finally, click Confirm to complete the action. If you wish, you can accept multiple orders from the list of received orders, just navigate to > Buy > Received Orders > Select the orders you want to accept and click on the link > Accept 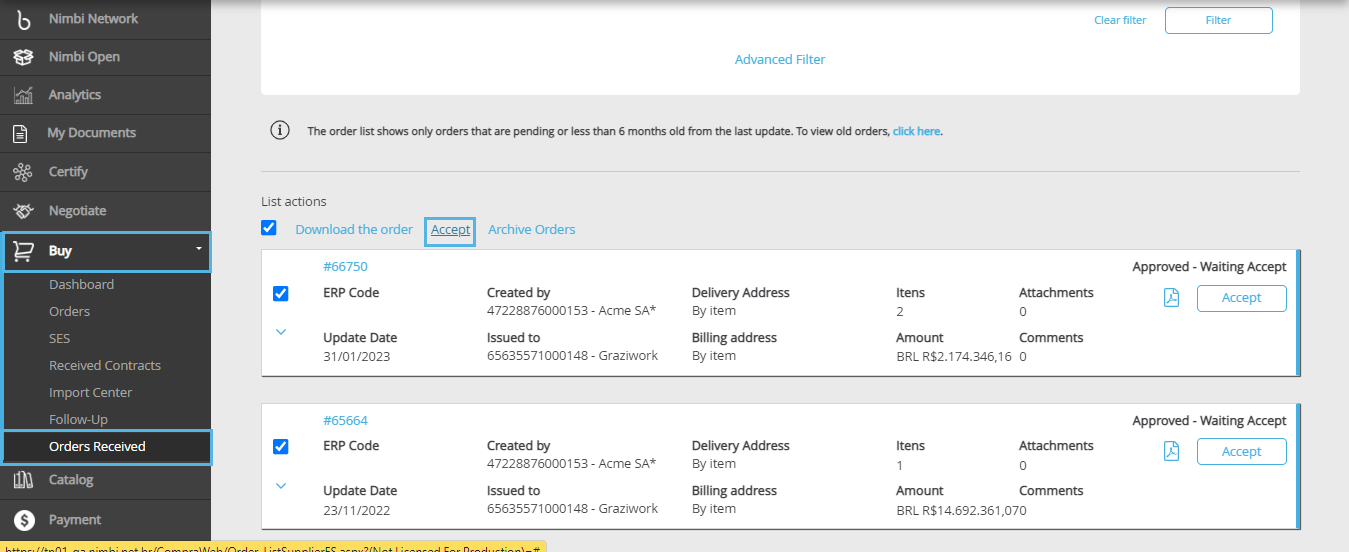 If all selected orders have the Pending acceptance status, a Pop Up will be displayed to add a comment and confirm the action, click > Confirm. 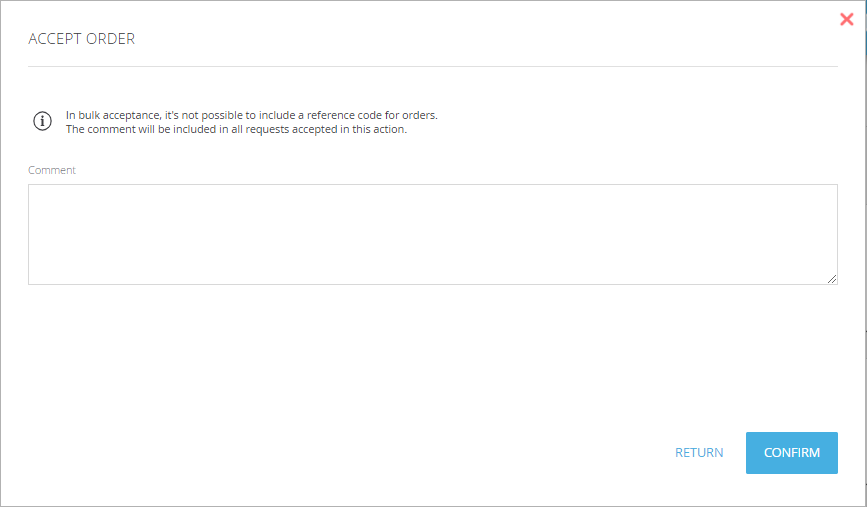 Note: In bulk acceptance it is not possible to include a reference code for orders. |
| Expand | |||||||||||||
|---|---|---|---|---|---|---|---|---|---|---|---|---|---|
| |||||||||||||
Acceptance of orders with Follow-up is done both through the option Follow-up available in the module Buy and also through the option Orders Received, also within the module Buy. Navigate to > Buy > Orders Received > Select the order you want to accept and click Accept; 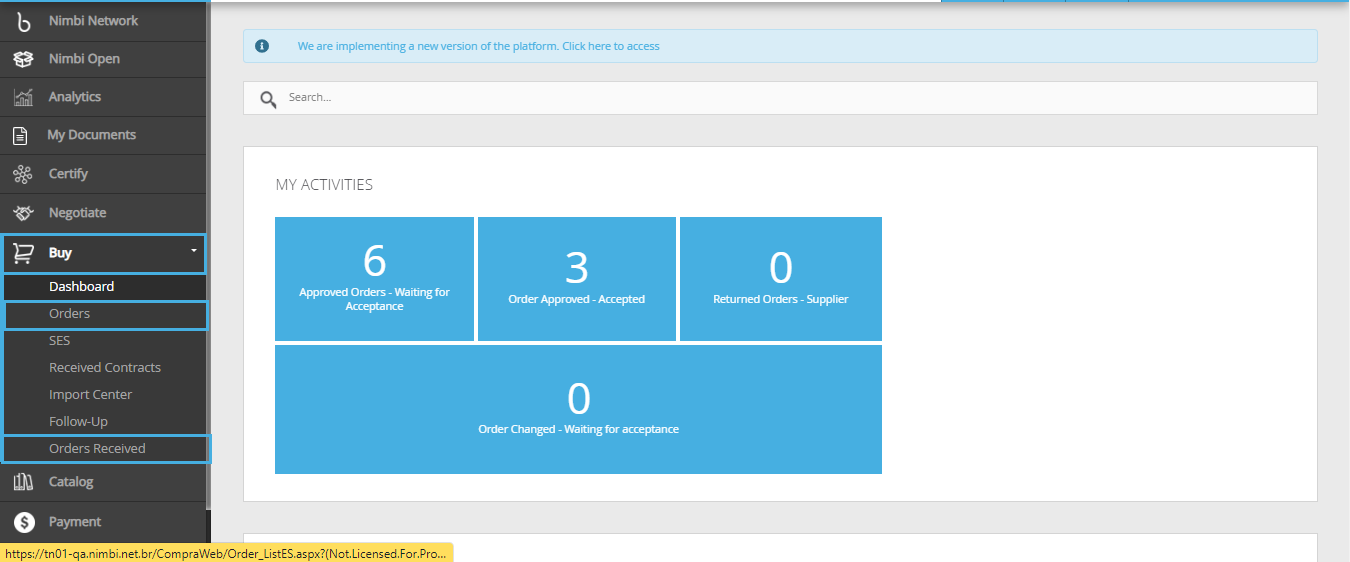 Note: In bulk acceptance it is not possible to include a reference code for orders. Correctly fill in the Delivery Forecast and > Estimated Billing Date fields that will be displayed for each item listed. After filling, click > Confirm. 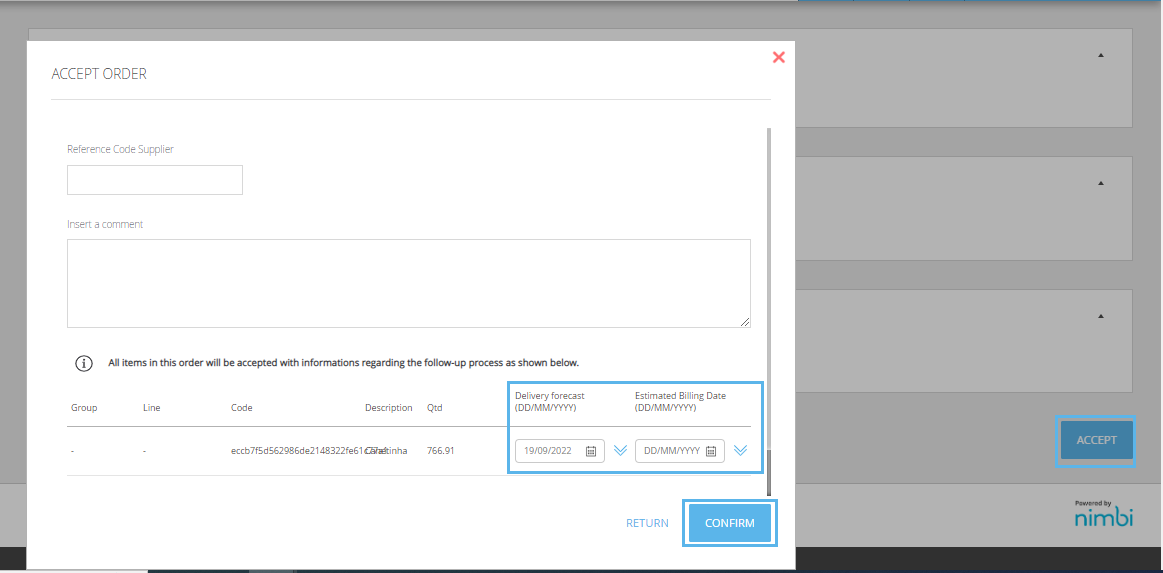
If any step is under your company's responsibility and action is required, you can complete it by selecting the desired items and clicking on Finish Step. Now, if you want to accept an order with Follow-up through the Follow-up tab, go to Buy > Follow-up > Locate and access the items referring to the desired order. 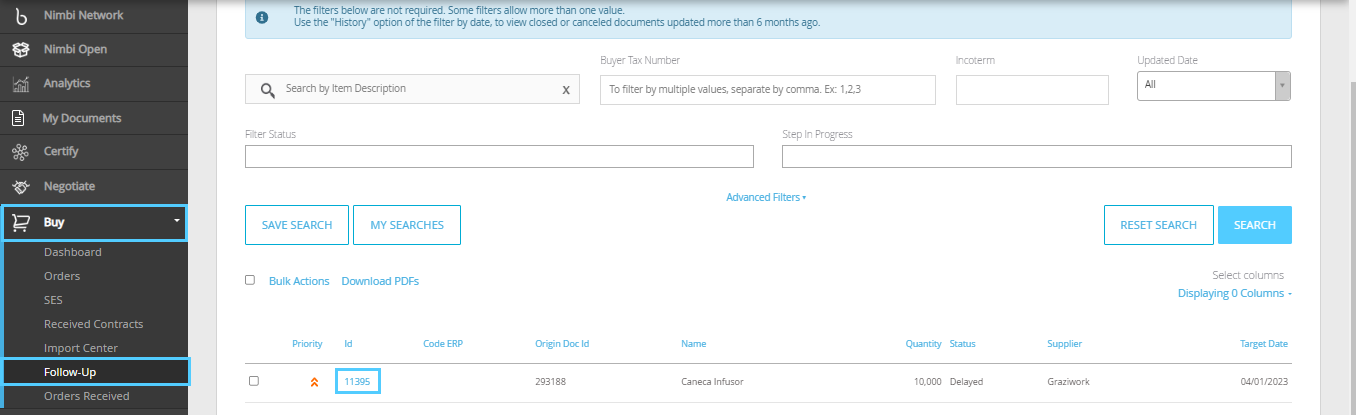 In the Current Situation panel, click on Actions > Accept. 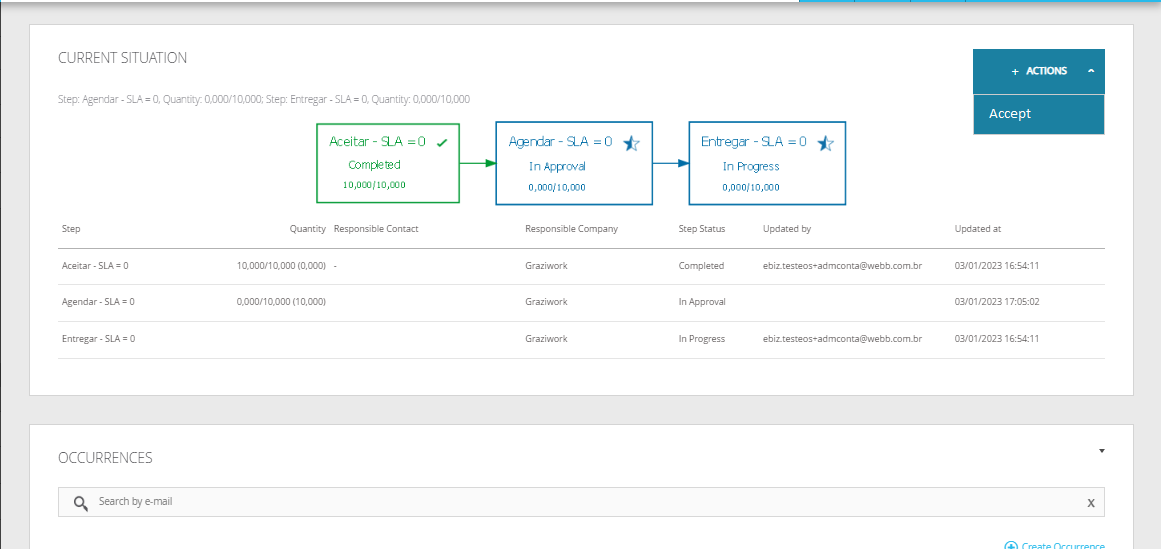
|
| Expand | ||
|---|---|---|
| ||
For orders with Follow-Up, in case of refusal, a pending issue must be created. In this way, the customer will identify the response to the order as Refused. Search for the desired order in Buy > Orders Received 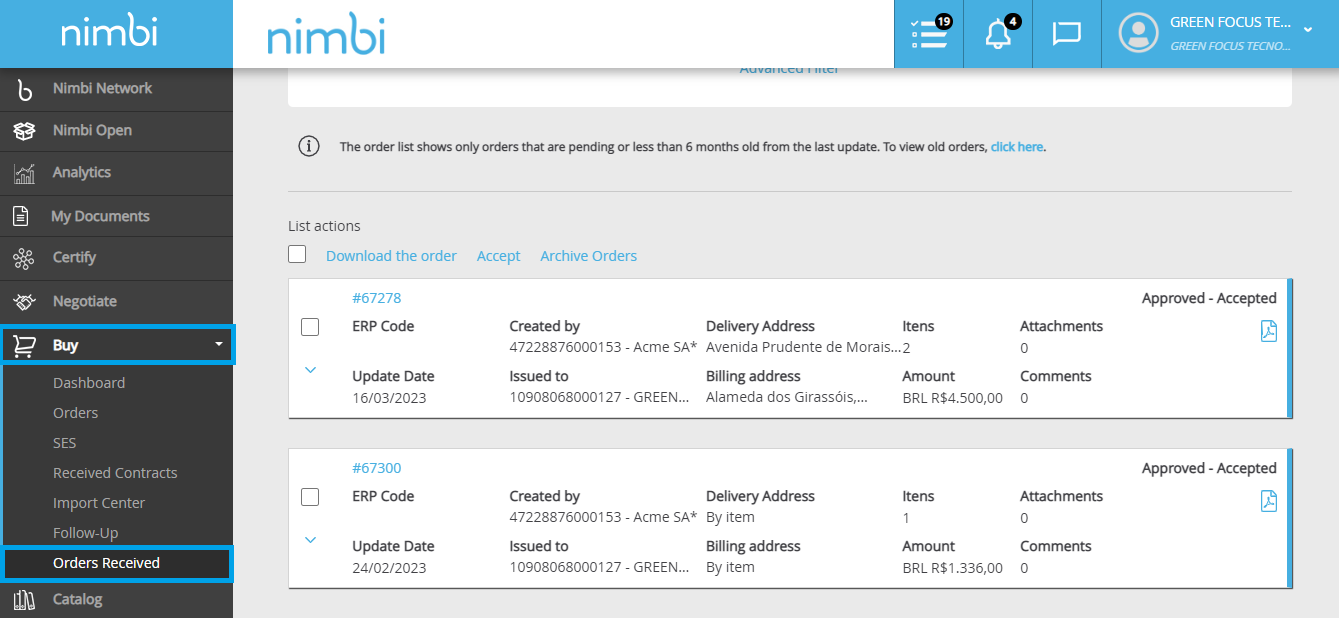 click on the desired order and navigate to the Items panel > Select the Follow-Up. Then select the desired item click on the option "Open occurrence".  Select the issue type, enter a comment and click the Save button; 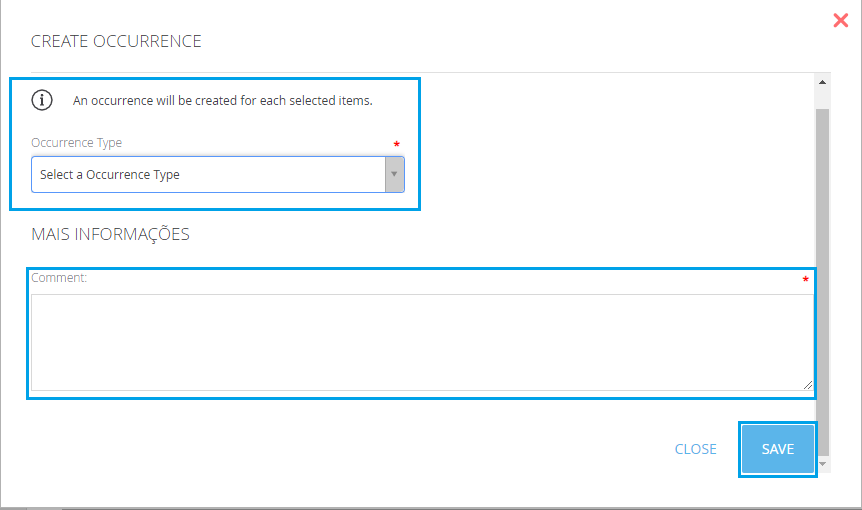 According to the options applied in this pending issue, the customer will analyze the appropriate actions in the order, such as carrying out a cancellation. It is also possible that the to-do item is created through Buy > Follow -Up > click on the desired order item that will be available in the Item Code column and on the next screen at the bottom of the screen; 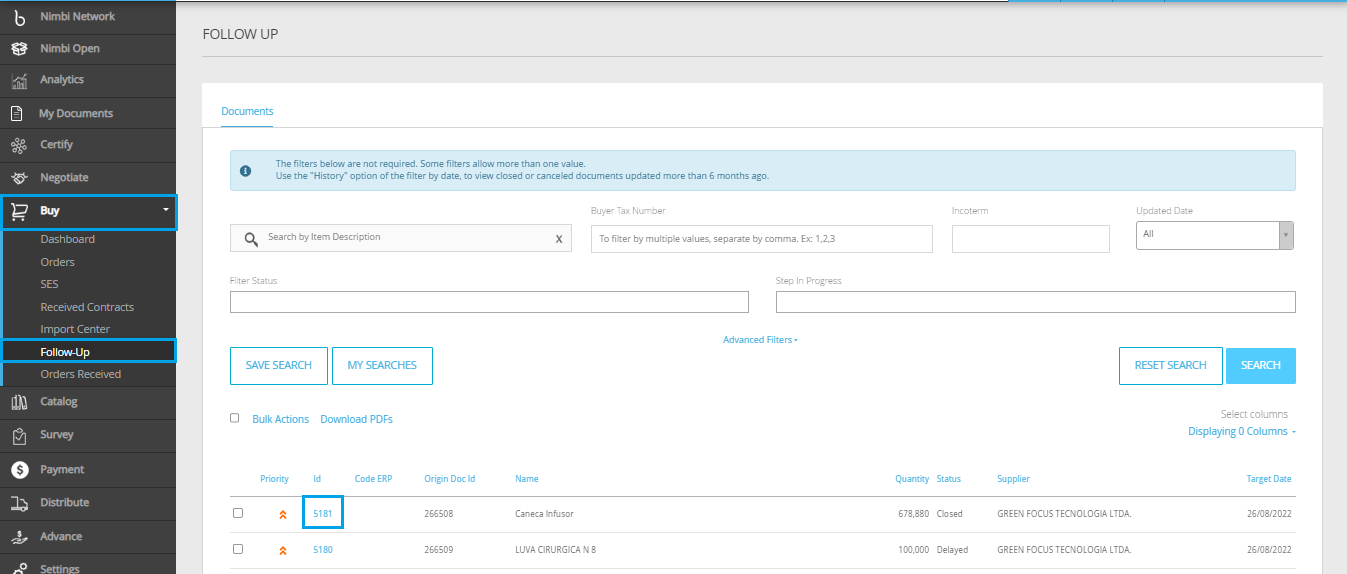 In the Occurrences panel click on +Create Occurrence. 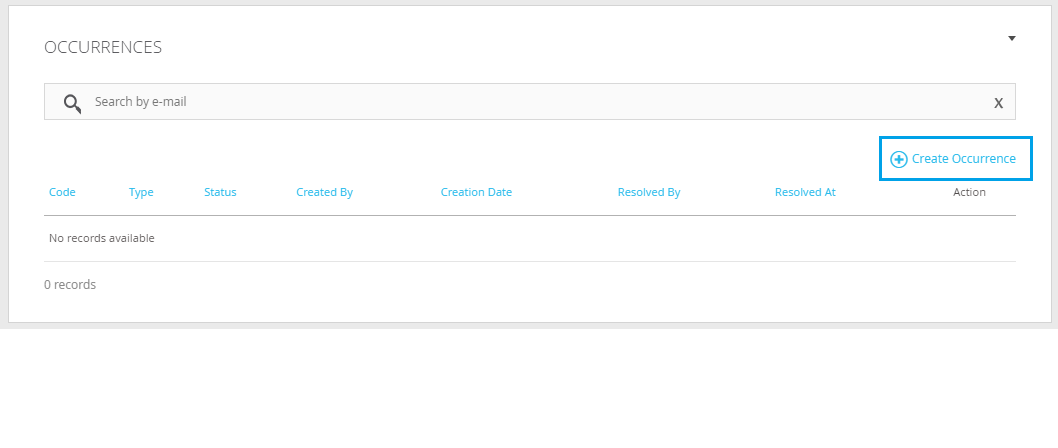
|
| Expand | ||
|---|---|---|
| ||
To archive orders, navigate to Buy> Orders Received , scroll the mouse cursor down until you see the order list; Select the orders you want to archive and click on Archive Orders;  The Pop-Up message will be displayed and after its confirmation the order will be archived. Note: After you archive the list orders, they will not be displayed in the standard search. To view the archived orders, it is necessary to consult them through the Advanced Filter and then select the option > View archived orders. 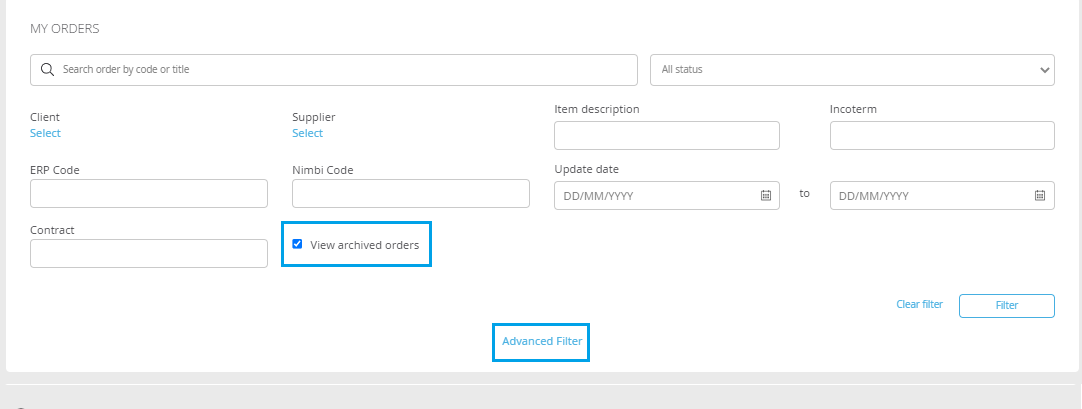 To unarchive the order, simply select the desired order and click on the link > Undo archiving.  If you want to use the actions in the Download the order and Accept list, just follow the same procedure, selecting the order and clicking on the desired link. |
| Expand | ||
|---|---|---|
| ||
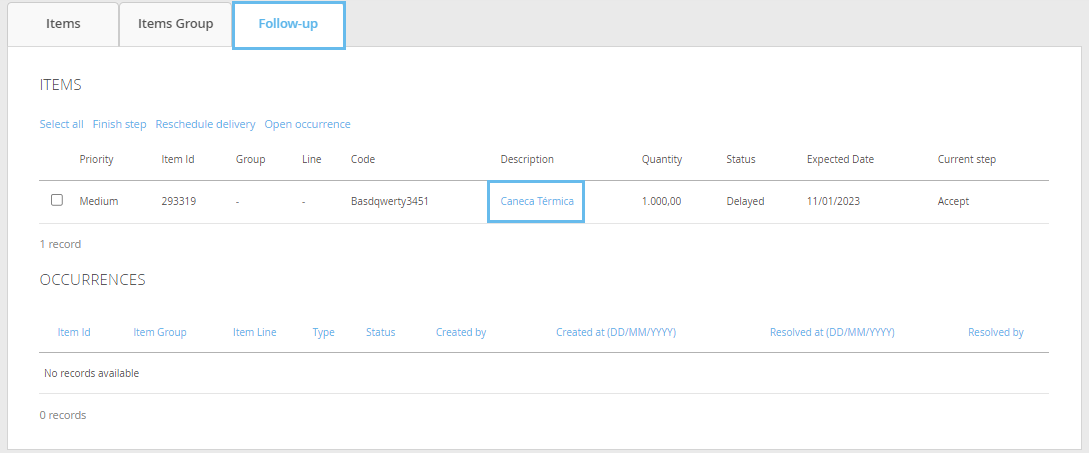
To be able to complete the steps of your order if it has a Follow-UP click on Buy > Orders > Select the desired order. 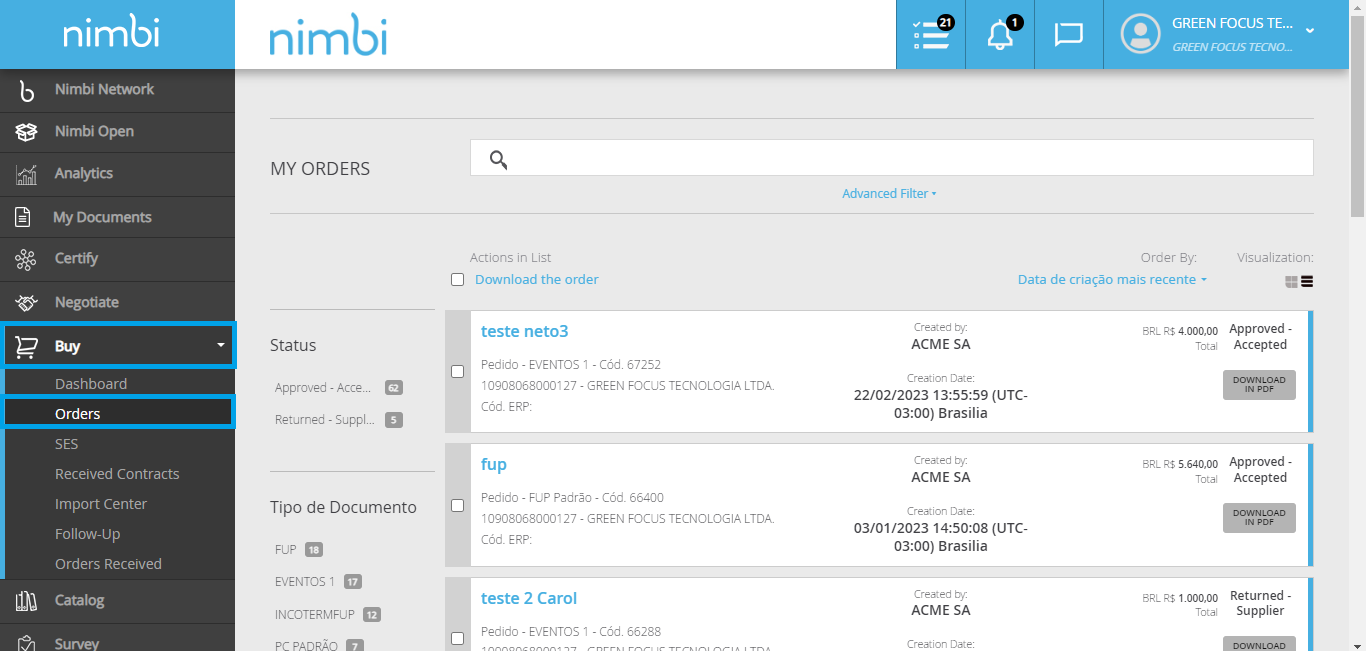 And when opening the order click on the Items panel click on the Follow-Up 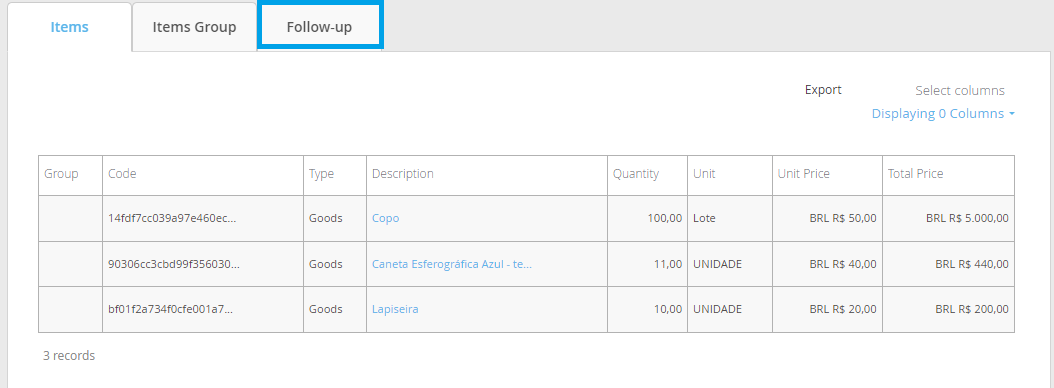 When accessing the Follow-Up tab, it is possible to view the steps as a link, and when selecting the orders listed, choose the step you want to perform by clicking on it; 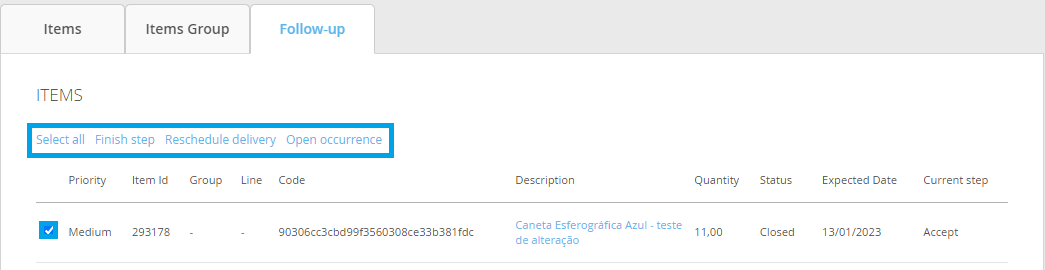
Within the available steps, you can: Select all, Complete step, Reschedule delivery and Open issue. |
| Expand | ||
|---|---|---|
| ||
When receiving a contract proposal, you will be notified by e-mail messages and in the communication center of the Nimbi Network. To access the contract, browse by Buy > Received Contracts > click on the title of the contract pending acceptance. 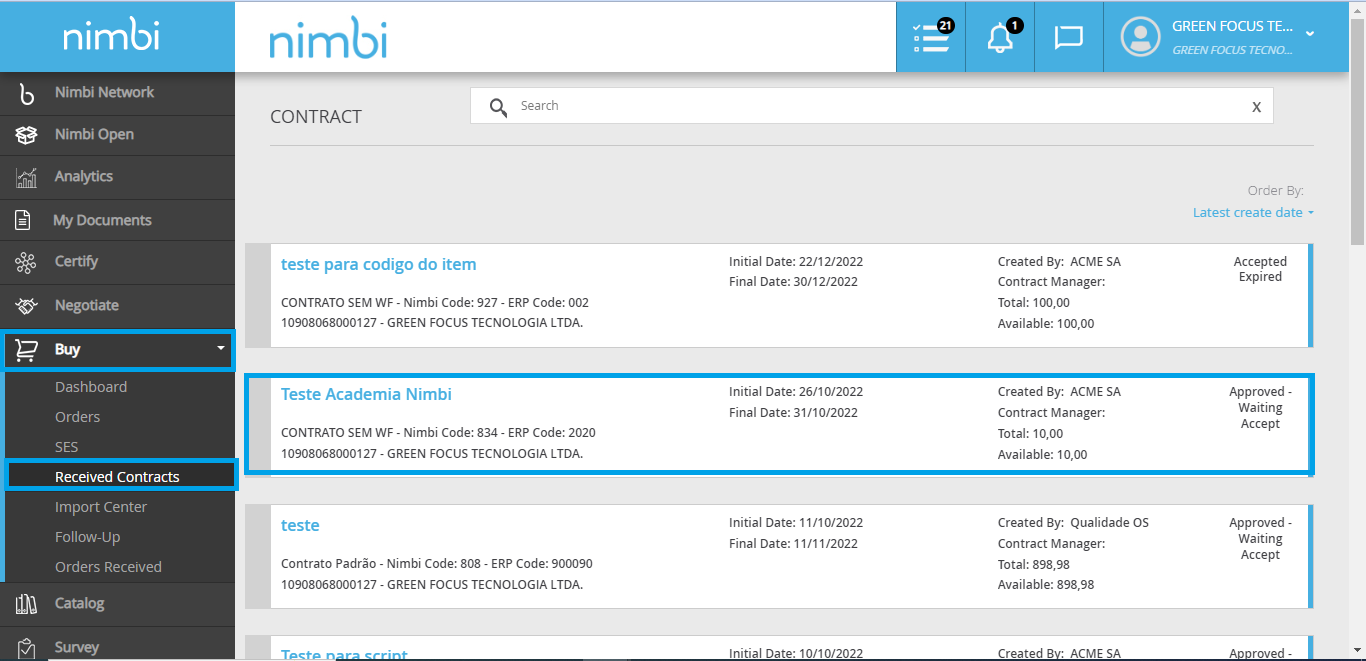 After analyzing the data, click on Accept or Refuse at the end of the page. 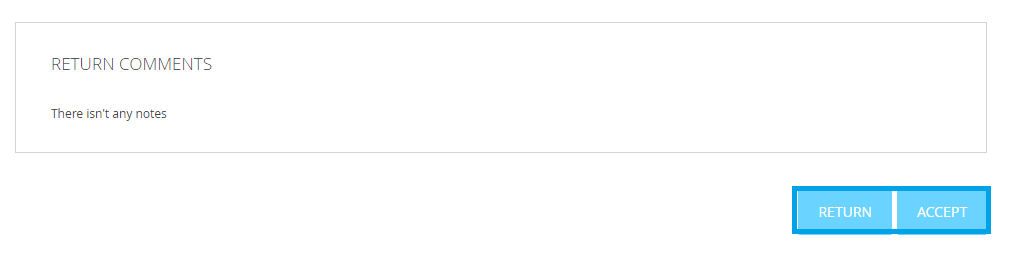 Remark: If the proposal is refused, the Purchaser/Customer may rectify it and publish it again. |
| Expand | ||||
|---|---|---|---|---|
| ||||
Browse by Buy > Orders > select the desired order.
Check the Reference Document dashboard and click the tab Measurements > Create SES; On the page New SES of the General dashboard, complete the fields such as Title and the user in charge Responsible. The user will be responsible for the validation of measurements, and it may be the manager or fiscal of the contract; On the SES Period dashboard, include the period of your measurement. On the Items dashboard, select a group of items for the measurement. It will only be possible to choose specific items in a group of selected items. After the completion, click on Save and view the items of the order to be measured. Remark: This field will only be editable when the measurement has the status Draft or Returned. To exclude items in a measurement, click the box on the left side of the order and click on Exclude. In column Qty. Measured, insert the information about the measured service. After that, browse to Measurement Final and select:
Remark: After this action, the order will no longer accept new measurements. Use the Attachments and Comments dashboards to include complementary data to the measurement. If you want to change attachment and comment visibility, click in the combo to define whether it will be Public or Private. The “Follow-up” dashboard will register the changes of status of measurement and the users responsible for the changes. |
| Status | ||||
|---|---|---|---|---|
|
| Expand | |
|---|---|
|
|
In the My Historic module; access the Orders option, view all orders that will be listed;
Remark: If the order has been sent by your customer through Follow up, when searching for the order, click on it and in the Items panel, select the Follow up tab > click on the link in the Description column; In the FUP DETAILS Panel, you can view the entire progress of the order. |
| Expand | ||
|---|---|---|
| ||
|
| Expand | ||
|---|---|---|
| ||
Navigate to My To-Dos > Orders > Order Lists which will be displayed at the bottom of the screen, pending and click on the desired order. 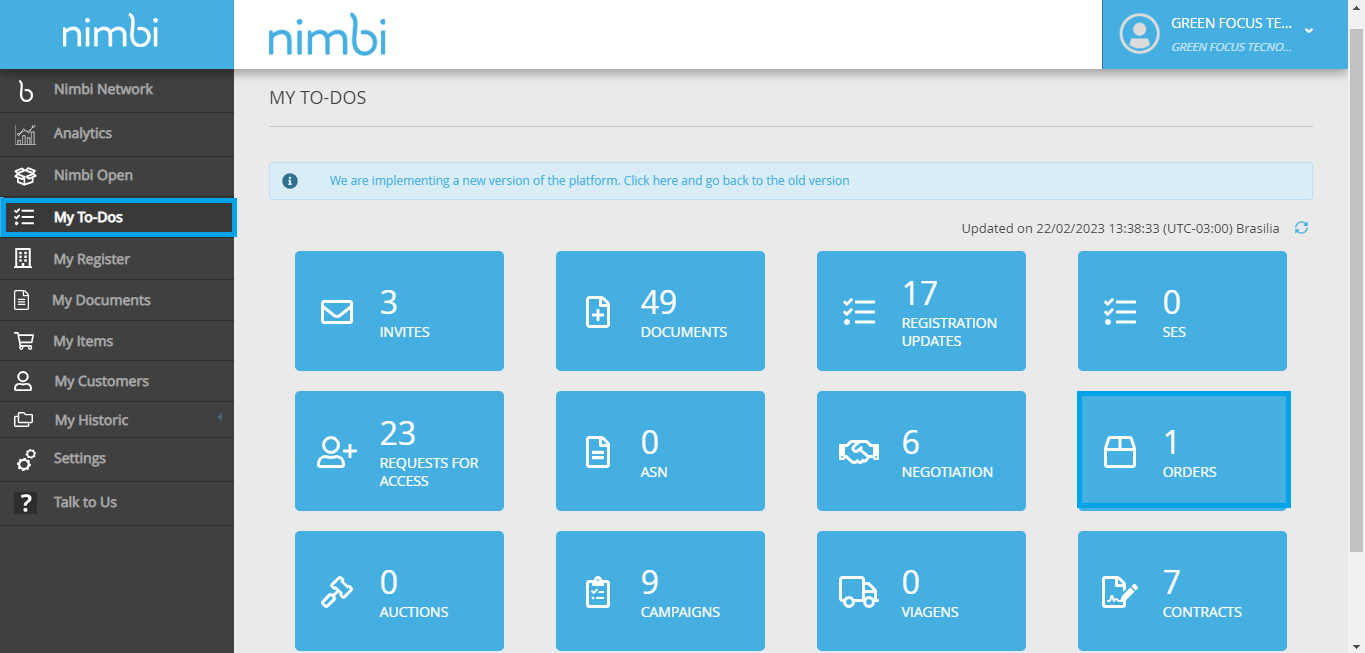 If you would like to see more information about the item, click on its ERP Code, a # followed by a number.  After reviewing all required information, click Reject or Accept 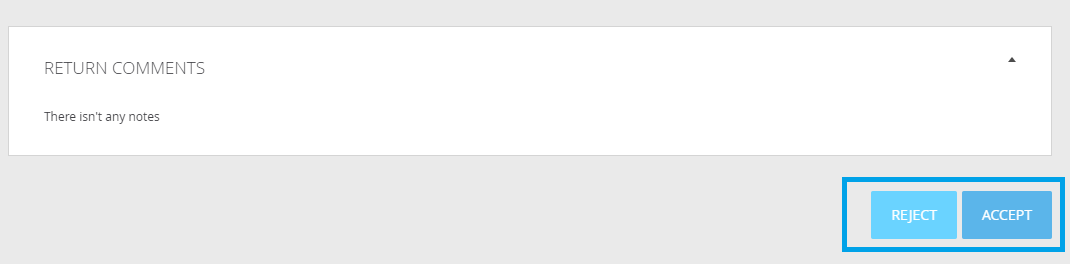 In the Accept Order popup, enter your referral code, if any; and a comment, if necessary. Just below, you will find the available orders in a list and if you want to Download orders, select it through the selection box and click Download Order.
If you wish to return, after clicking on the respective button, you must inform the reason for the return and include a comment. Finally, click Confirm to complete the action. If you wish, you can accept multiple orders in the received orders list, select the orders you want to accept and click the link > Accept. 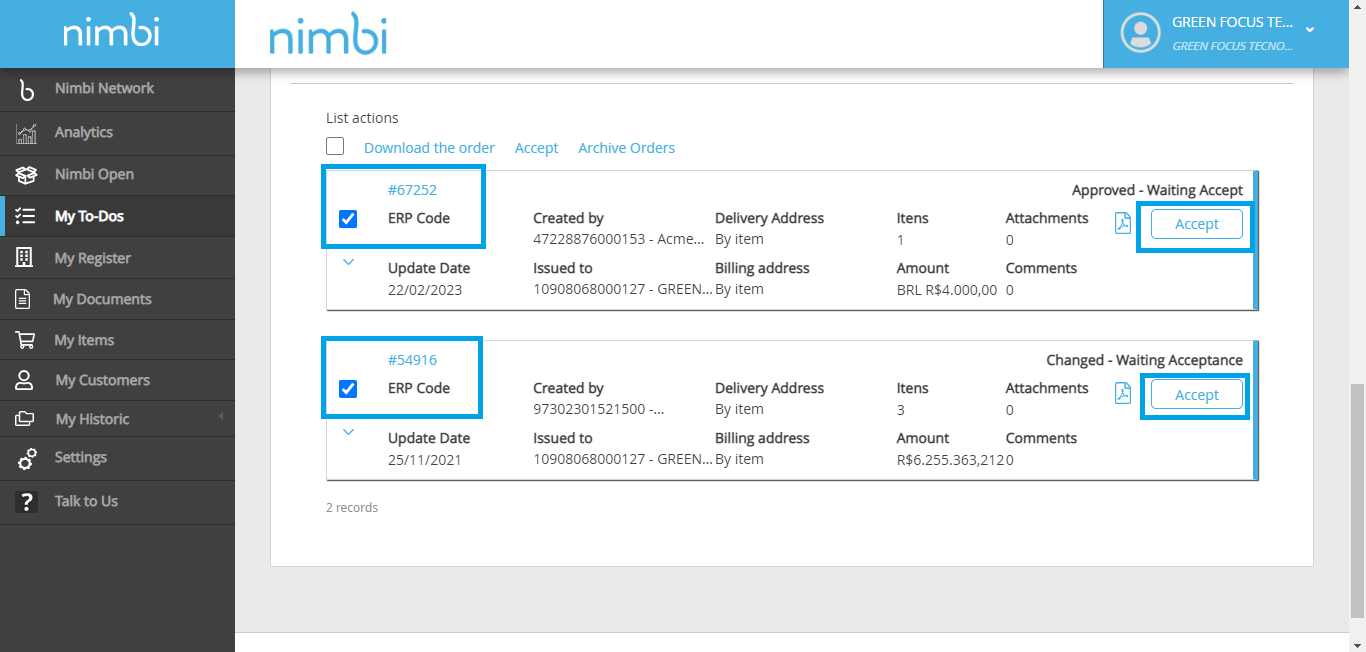 If all selected orders are in Pending Acceptance status, a popup will appear to add a comment and click Confirm. 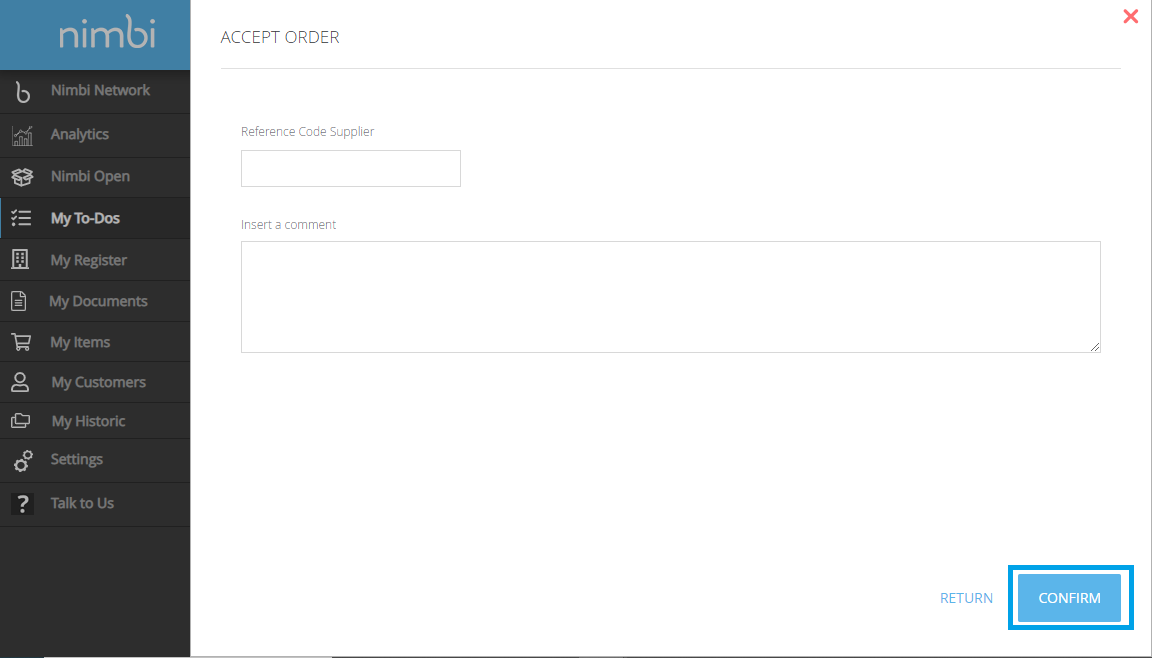 Remark: In bulk acceptance, it is not possible to include a reference code for orders. |
| Expand | ||
|---|---|---|
| ||
Navigate to My Historic > Follow-Up > scroll down and the list of items will be displayed, locate and click on the desired order. 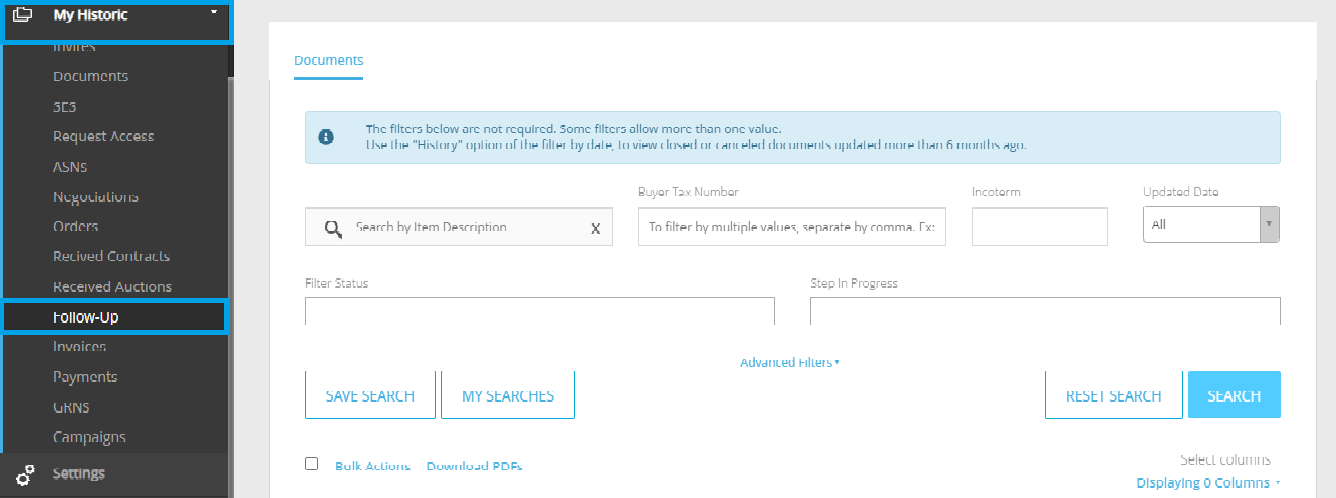
In the list that will be displayed at the bottom of the screen, locate the desired order and click on the link in the "Code" column. 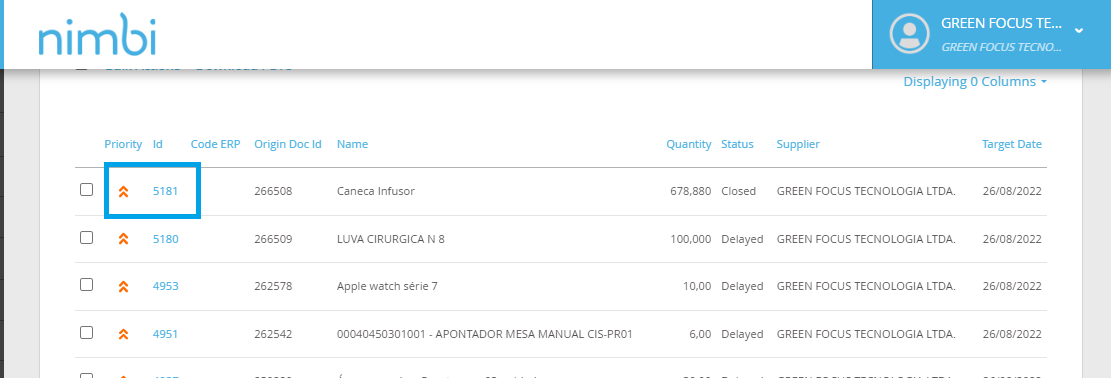 In the Current Status panel, click + Actions > Accept. If you wish, you can accept orders through the My To-Dos > Orders: 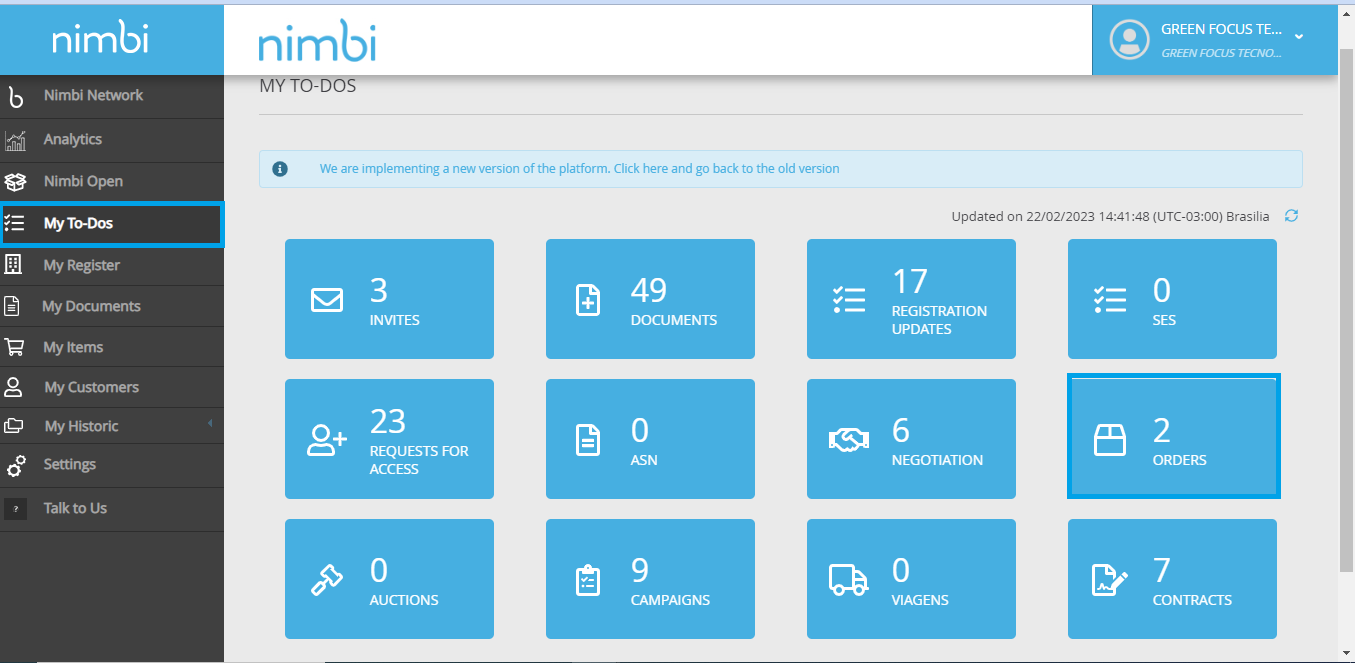 Roll the mouse cursor down, select the request in the checkbox and the option Actions in List > Accept. 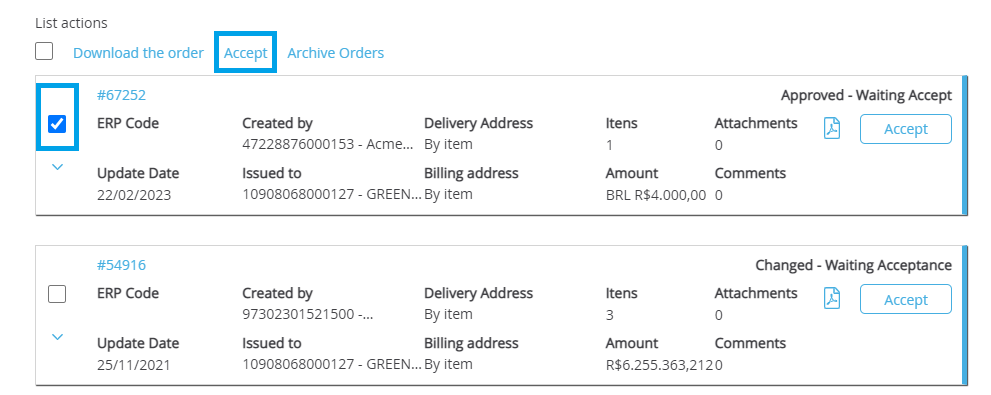 Remark: In bulk acceptance, it is not possible to include a reference code for orders. |
| Expand | ||
|---|---|---|
| ||
To archive orders, navigate to My Historic > Orders, scroll the mouse cursor down until you see the order list; 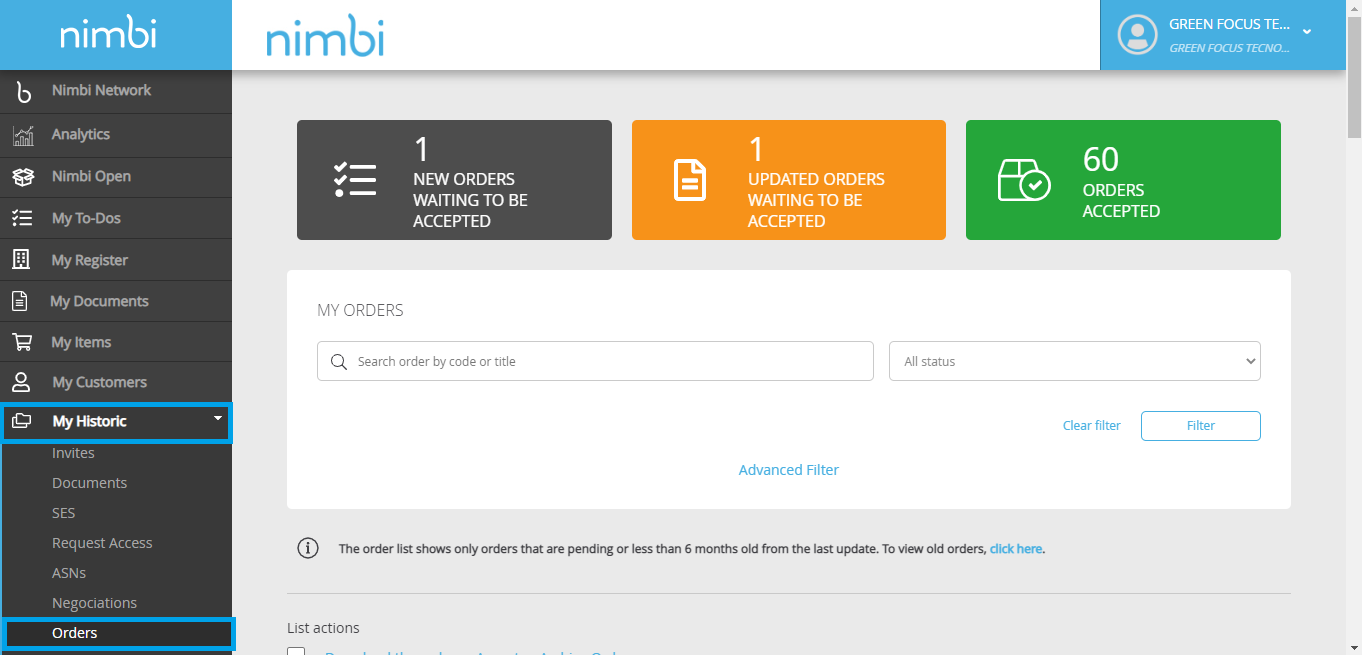 Select the orders you want to archive and click on Archive Orders; The Pop-Up message will be displayed and after its confirmation the order will be archived.  Note: After you archive the list orders, they will not be displayed in the standard search. To view the archived orders, it is necessary to consult them through the Advanced Filter and then select the option > View archived orders. To unarchive the order, simply select the desired order and click on the link > Undo archiving 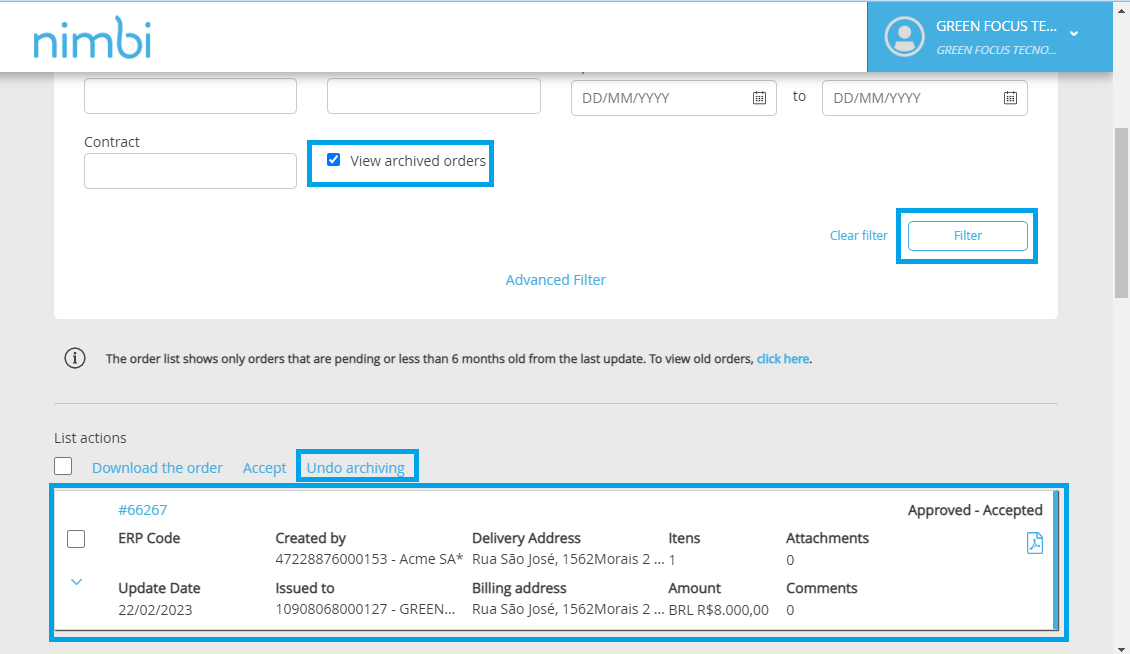 If you want to use the actions in the Download the order and Accept list, just follow the same procedure, selecting the order and clicking on the desired link. |
| Expand | ||
|---|---|---|
| ||
For orders with Monitoring, in case of refusal it is necessary to create a pending issue. This way the customer will identify the response to the order as Refused. Access My To-Dos > Order 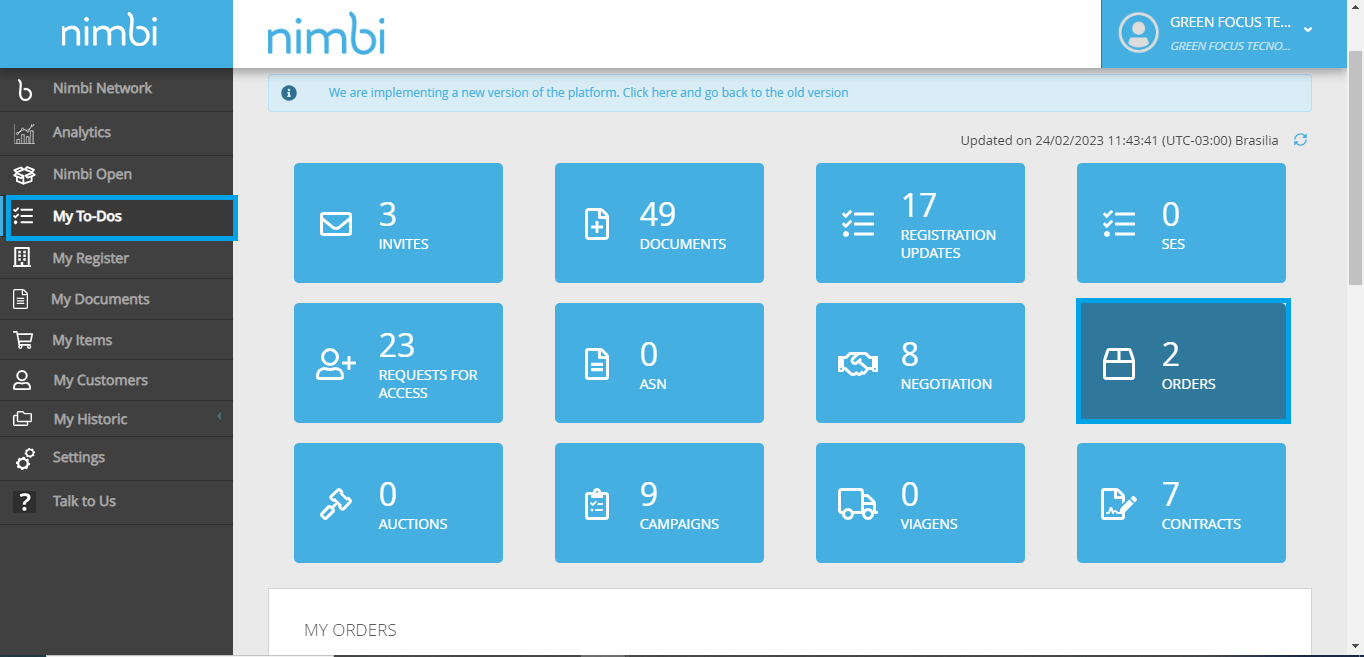 And click on the ERP Code of the desired order  Navigate to the Items panel, select the Follow-up.  Select the Follow-up, select the desired item, click on the "Open occurrence" option > select the occurrence type. 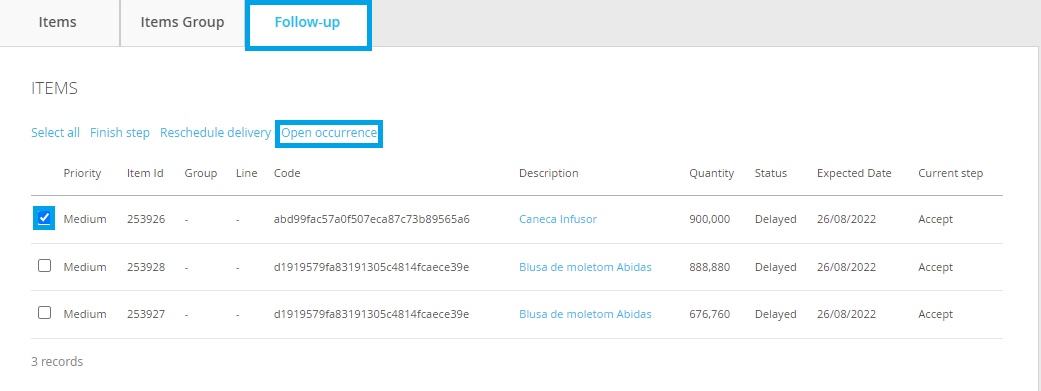 Enter a comment and click the Save button; 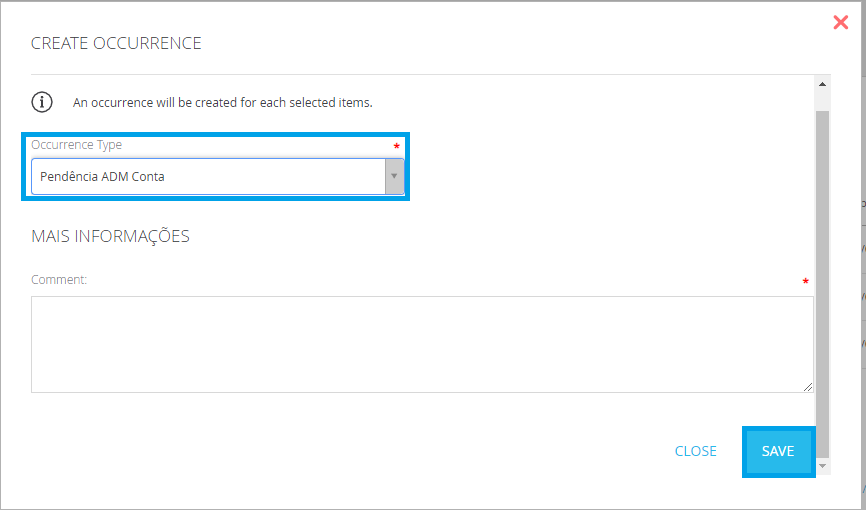 To open a pending order for the desired order, go to My Historic > Follow-up, click on the desired order code. 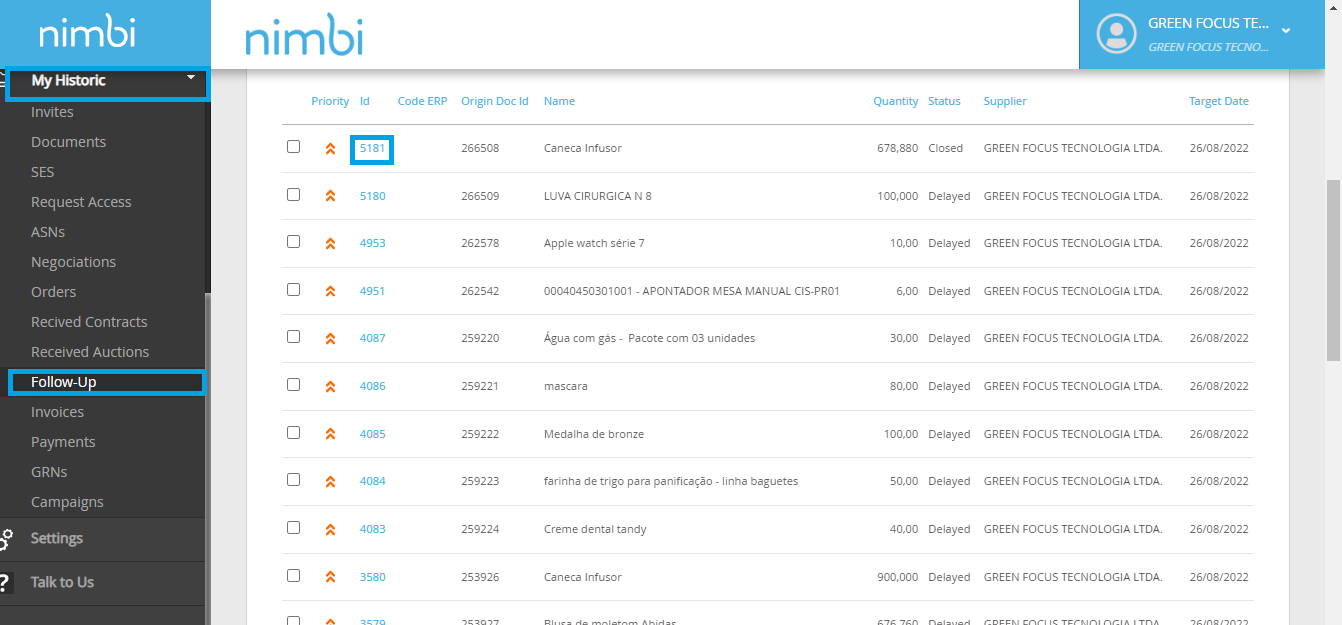 Click on the desired order code > Navigate to the Occurrencespanel (Bottom part of the screen), Click ""+ Create Occurrence"" (right side of the screen) > Then select the type of Occurrence. 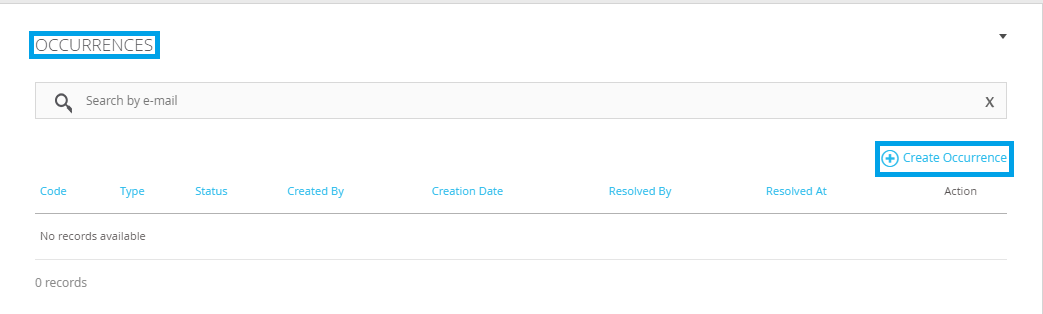 Enter a comment and click the Save button; 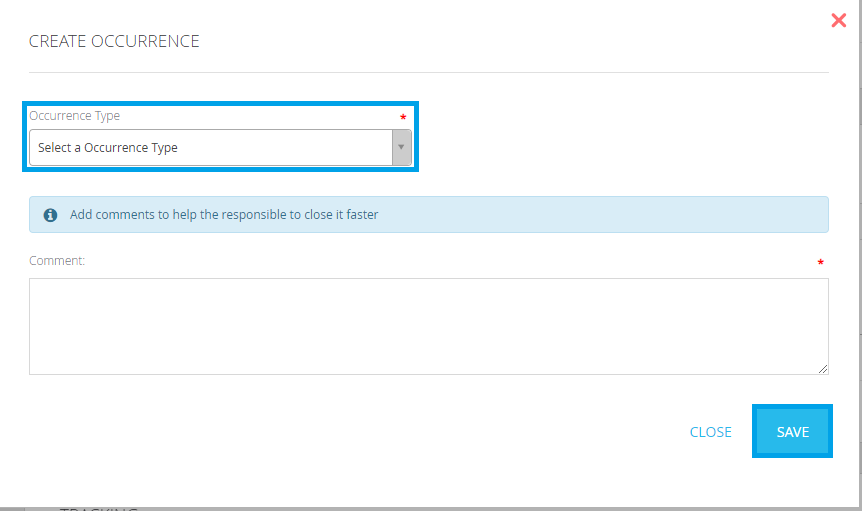 According to the options applied to this pending order, the customer will analyze the necessary actions in the order, such as cancellation. |
| Expand | ||
|---|---|---|
| ||
Updating your order with Follow-UP can be done in two ways: Go to: My To-Dos > Orders; 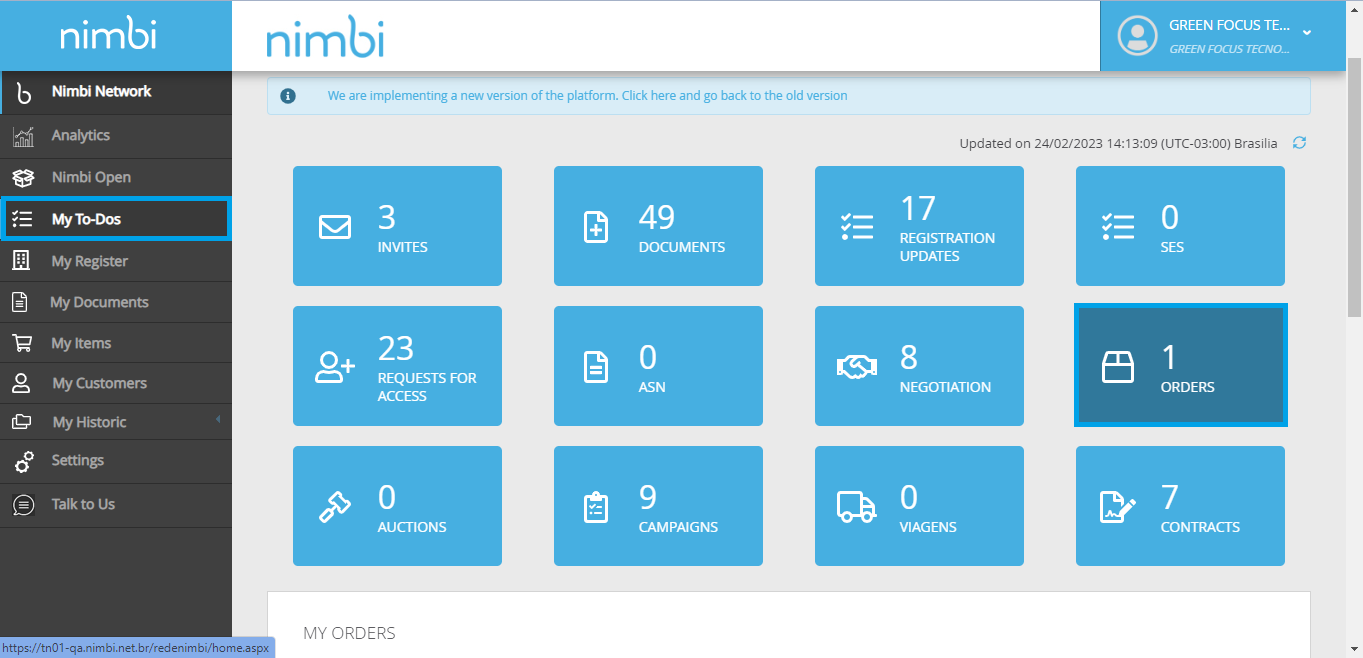 After displaying the order list, click on the desired order; When opening the order, in the Items panel, select the Follow-up tab and click on the Complete step link, to carry out the step the order is in and update to the next step. 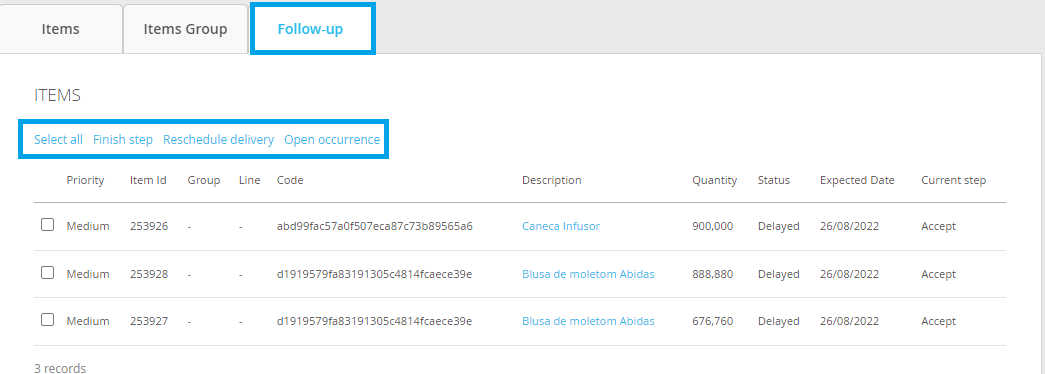 If you wish, you can also update the Tracking step of your order in My historic > Follow-up; 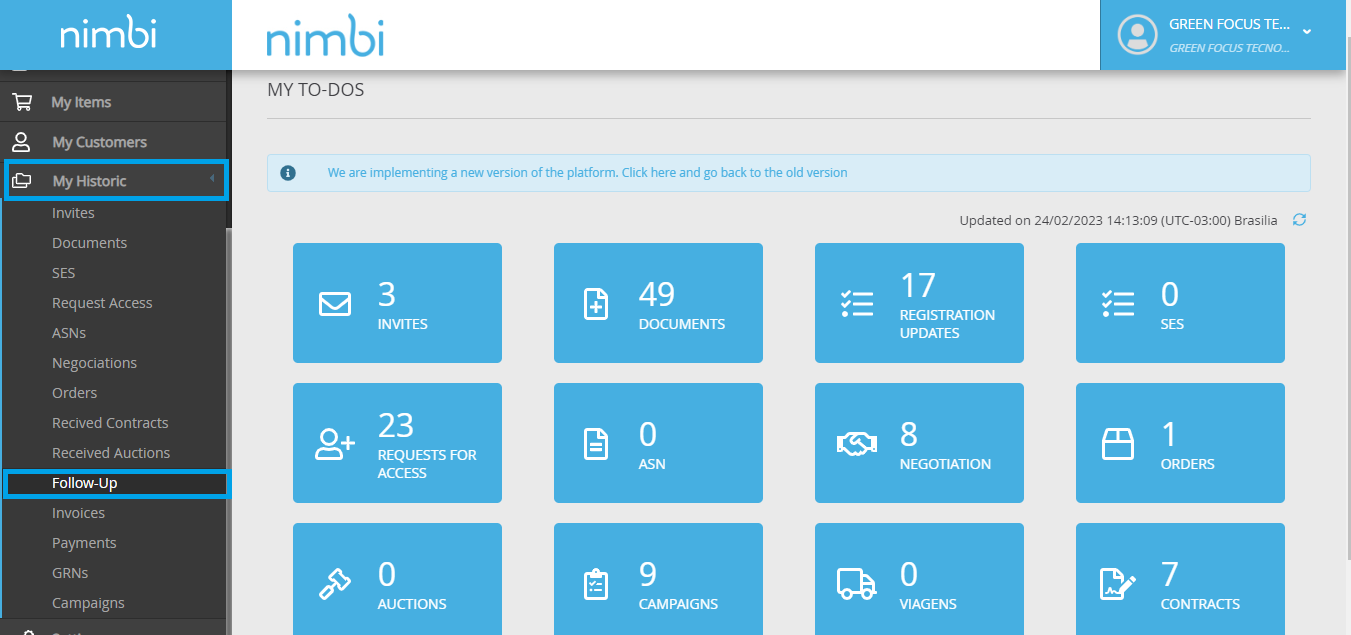 Click on the item code and in the Current Situation panel, verify that in the Responsible field your company is designated as responsible for the stage the order is at. 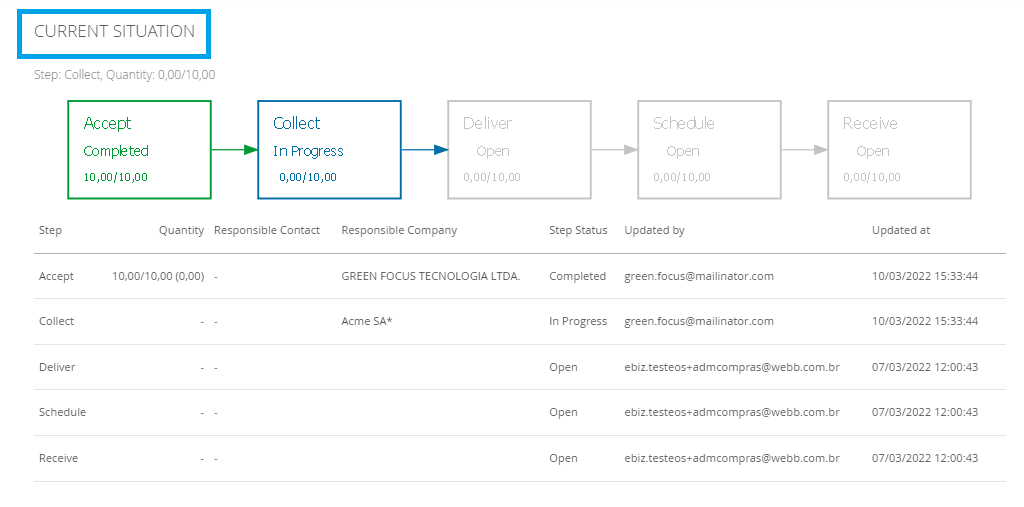 After confirming that your company is responsible for the pending step to be updated, click the +Actions button and complete the step you want to update. |
| Expand | ||
|---|---|---|
| ||
To view the entire history of contracts, simply navigate to My Historic > Received Contracts. 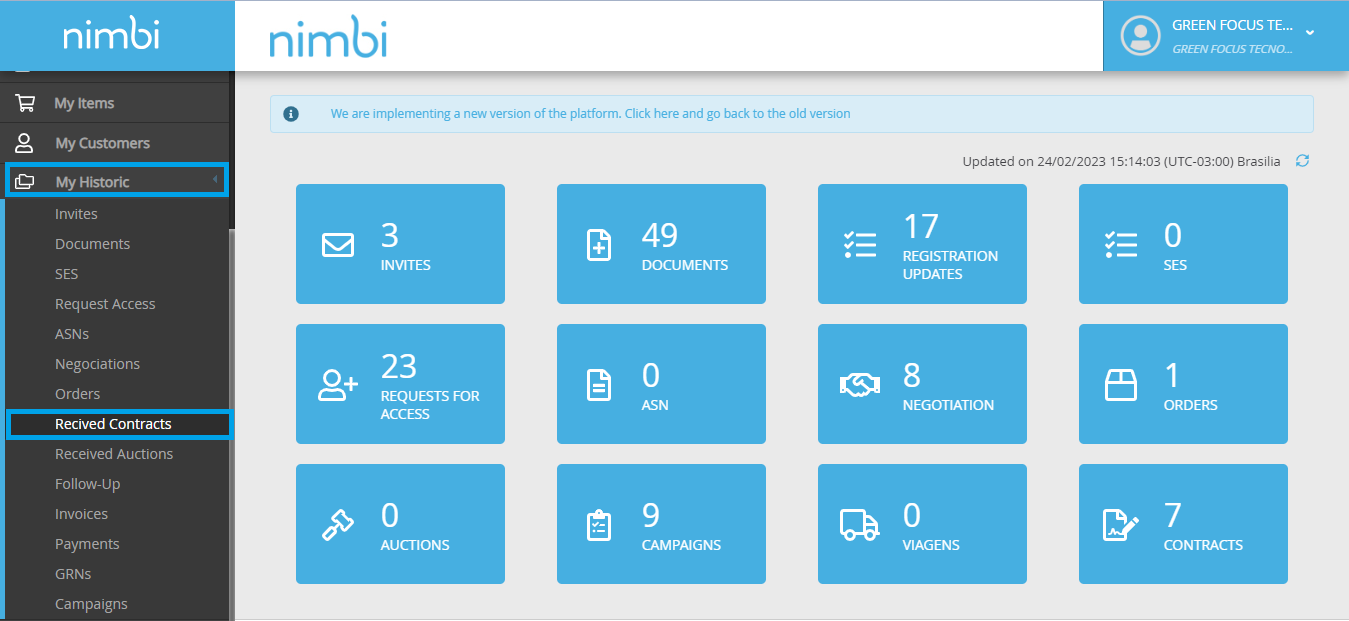 |
| Expand | ||
|---|---|---|
| ||
To view pending contracts on the nimbi network, go to My To-Dos > Contracts 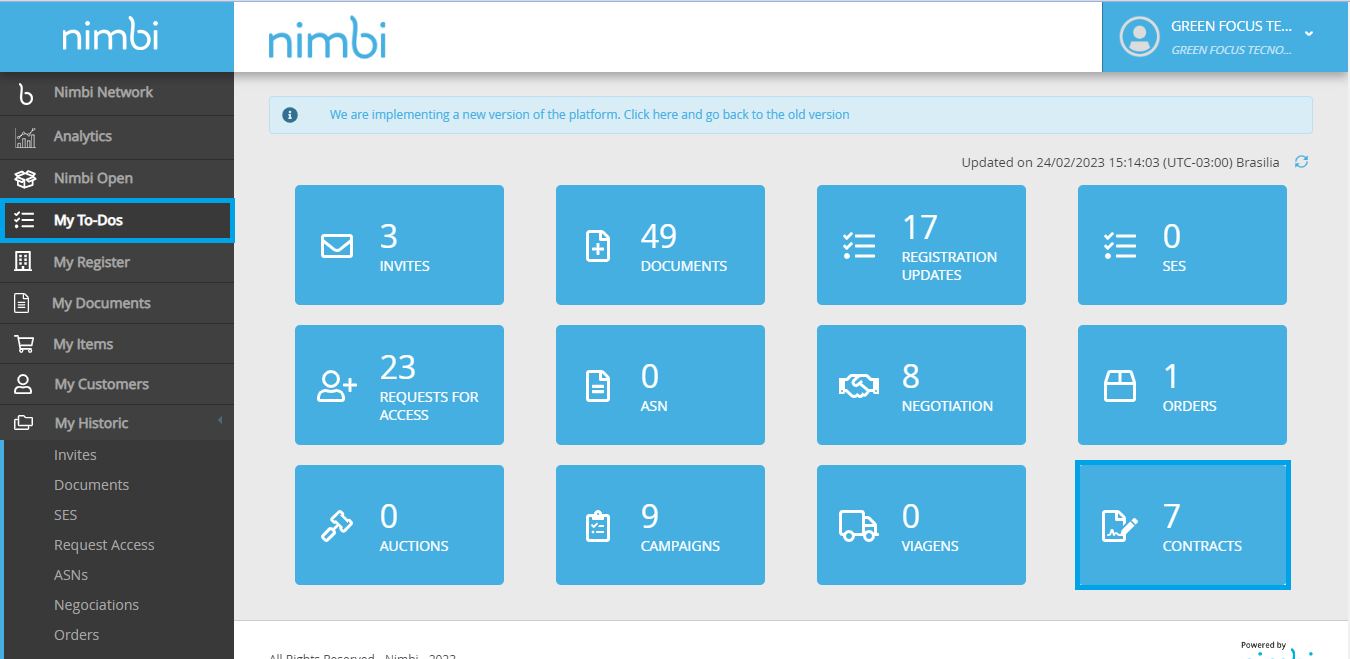 |
| Expand | ||||
|---|---|---|---|---|
| ||||
Navigate to My To-Dos> Select the desired order 
Check the Reference Documents panel and click on the Measurements > Create SES; 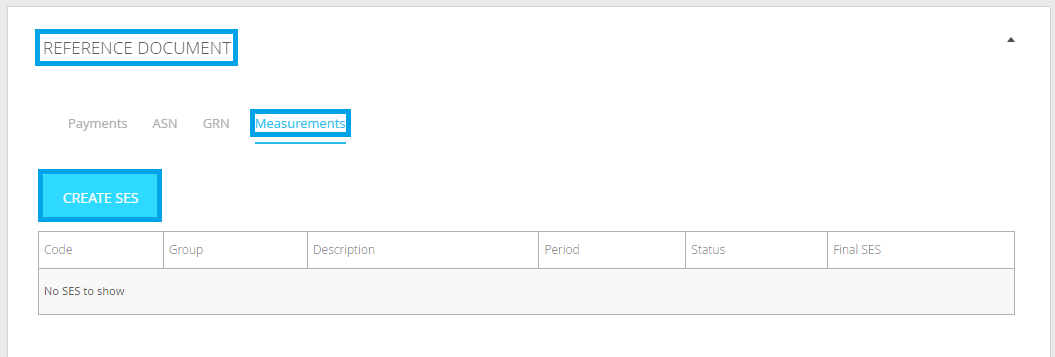 On the "New Measure" page in the General panel, fill in the fields like Title and the user Responsible. 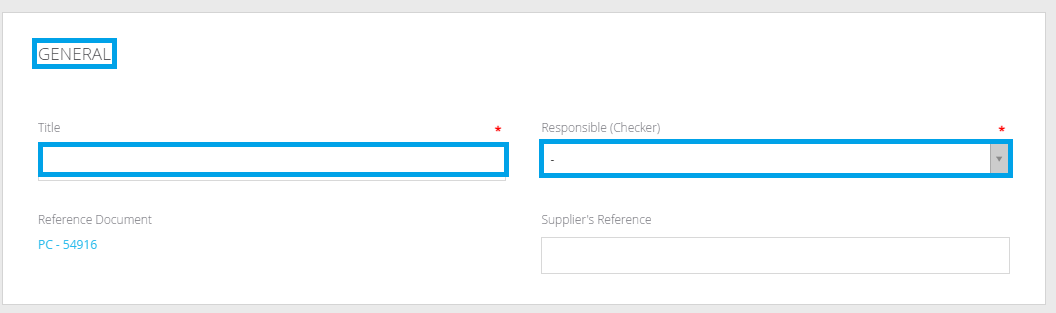 The user will be responsible for validating the measurements, and may be the contract manager or inspector; In the SES Period panel, add the period your measurement covers.  In the Items panel, select a group of items for your measurement. You will be able to choose specific items within the selected item group. Once complete, click Save and view the order items to be measured. Note: This field will only be editable when the measurement is in In Composition or Returned status. To exclude items from measurement, click the box to the left of the order and click Exclude. In column "Qty. Measure", enter information about the measured service. Then go to "Final Measurement" and select:
Note: After this action, the order will not accept new measurements. Use the Attachments and Comments panels to add supplemental data to the measurement. If you want to change the visibility of the attachment and the comment, click on the combo to define whether it will be "Public" or "Private". In the “Monitoring” panel, changes in the status of the measurement and the users responsible for the changes will be recorded. At the end of the operation, click on Save, to save the changes in the measurement, or Send, to send your measurement." |