| Rw ui layout macro |
|---|
Manuals
Frequently Asked Questions
| Status | ||||
|---|---|---|---|---|
|
| Status | ||||||
|---|---|---|---|---|---|---|
|
Unified Procedures: Settings
- Register and Setting up Addresses / Plants on company's Nimbi account
- Create and Associate Value List (Unit of Measure)
|
| Expand | ||
|---|---|---|
| ||
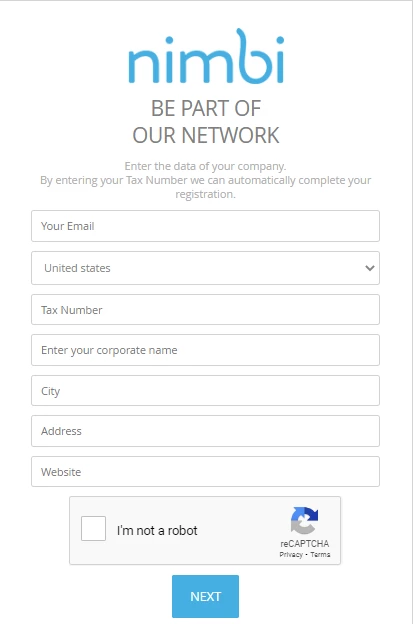
Access our site at www.nimbi.com.br then click on Login;  You navigation will be redirected to the login page, click on Don’t have an account?, create one now; 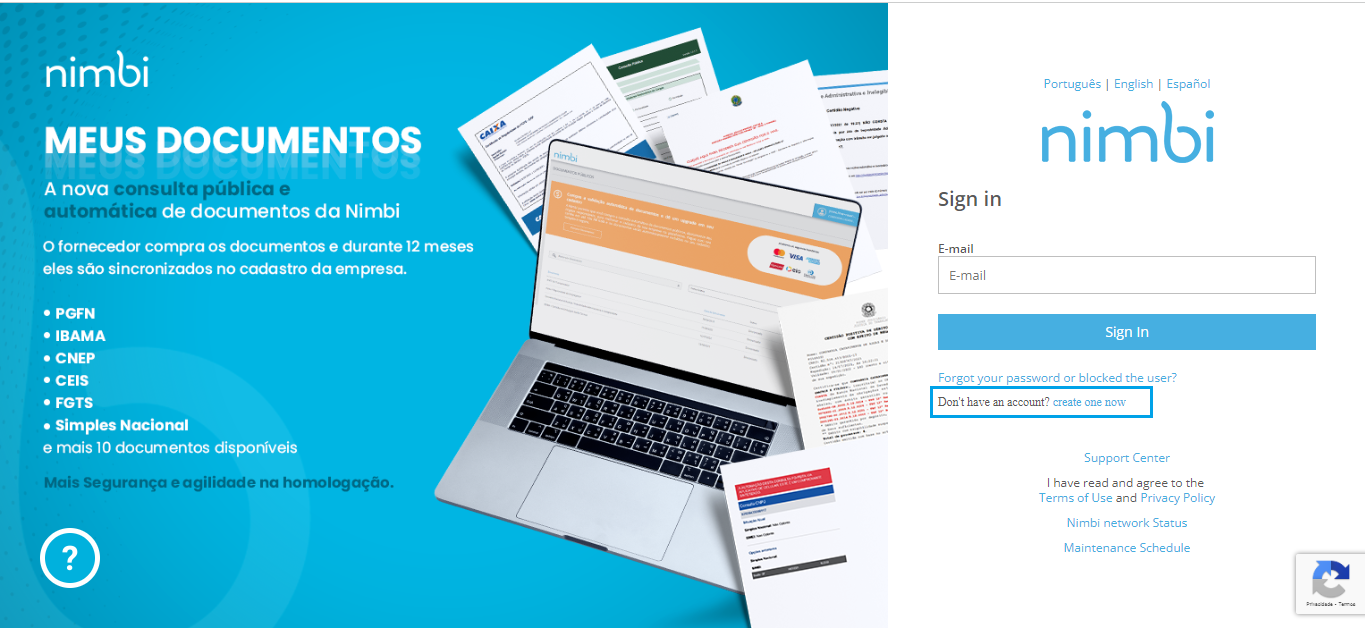 Fill out the requested fields as shown below:
|
| Expand | ||
|---|---|---|
| ||
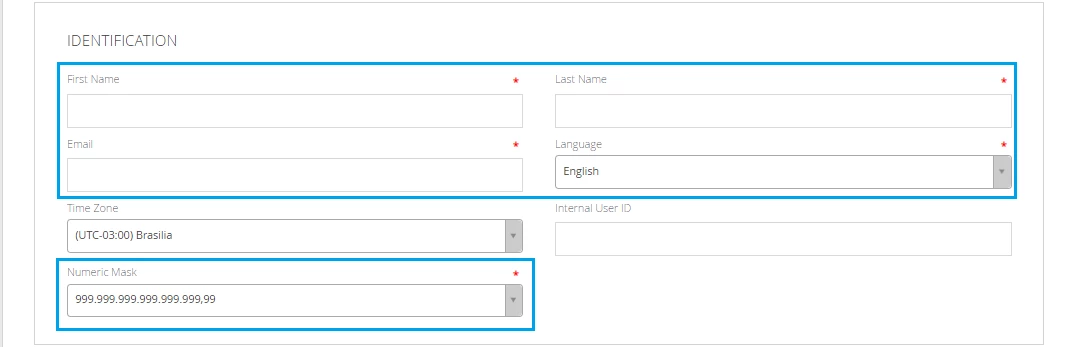
How do I register a User from my company on the Nimbi Network? Here are the steps required to register a user from your company on Nimbi network. To add a user to your company on the Nimbi Network is very easy. Access the system and go to Settings > Nimbi Network > Users. 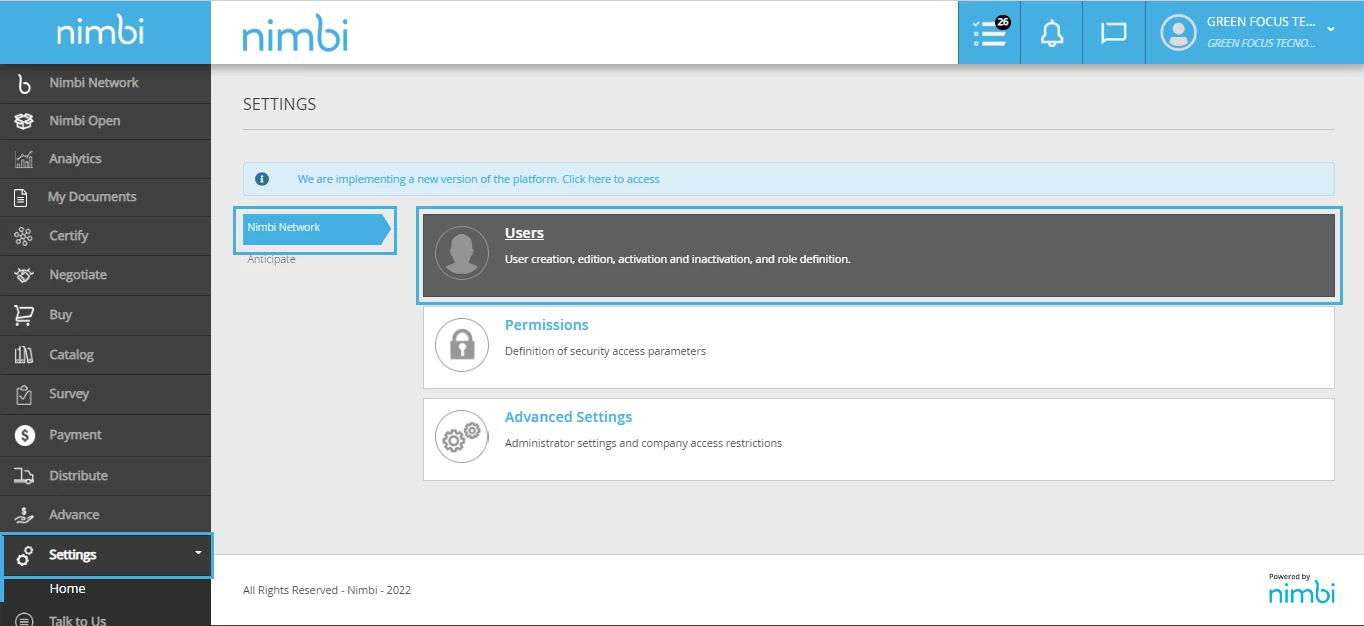 To register a new user, go to the Users section, click Add and choose the One User option. 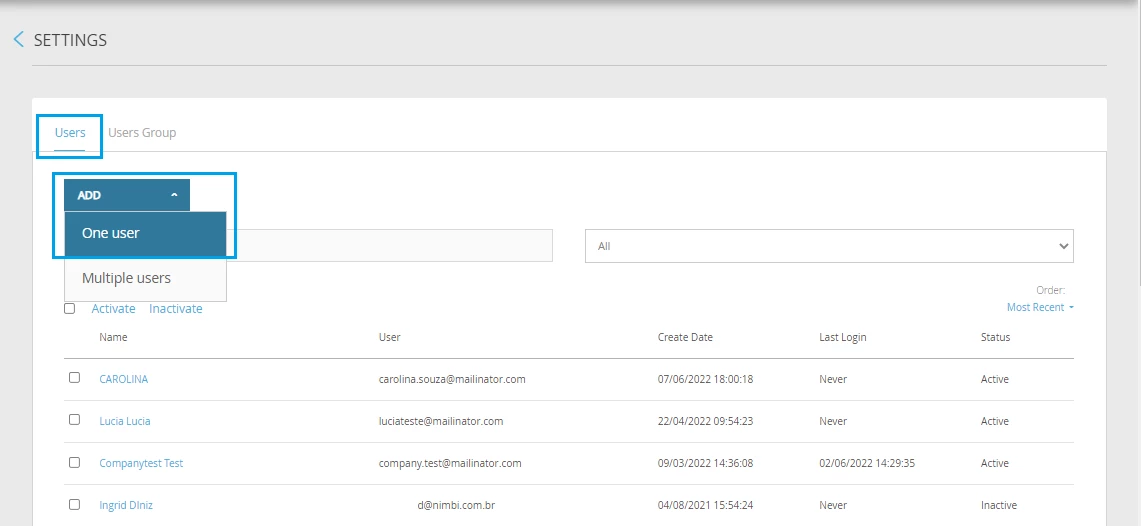 Select a profile photo by clicking Change Profile Image; 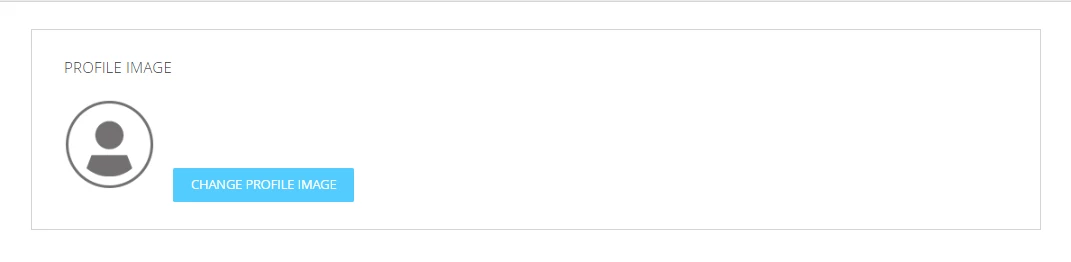 In the Identification panel, fill in the required fields, marked with red start. They are:
 In the Access Credentials panel, in the field Standard Application, select the option Certify then click Save. When you click Add, the system displays the registration message successfully and the user will be registered in the user list for the company.  After creating the user, you need to define what will be his/her permission in the system. To do this, go to the Permissions option. Click Settings, in the profile configuration screen, select the profile that this user needs to have in the system, and click save to store the selected information. When you click save, the system displays the setup message successfully saved, and in the Profiles column you can see which profiles the user is associated. |
| Expand | ||
|---|---|---|
| ||
Access the Portal with your login and password and navigate to the Settings menu. On Nimbi Network, click Permissions to set Administrator settings.  Important: By granting the permission, the user can answer negotiations and edit the company registration. 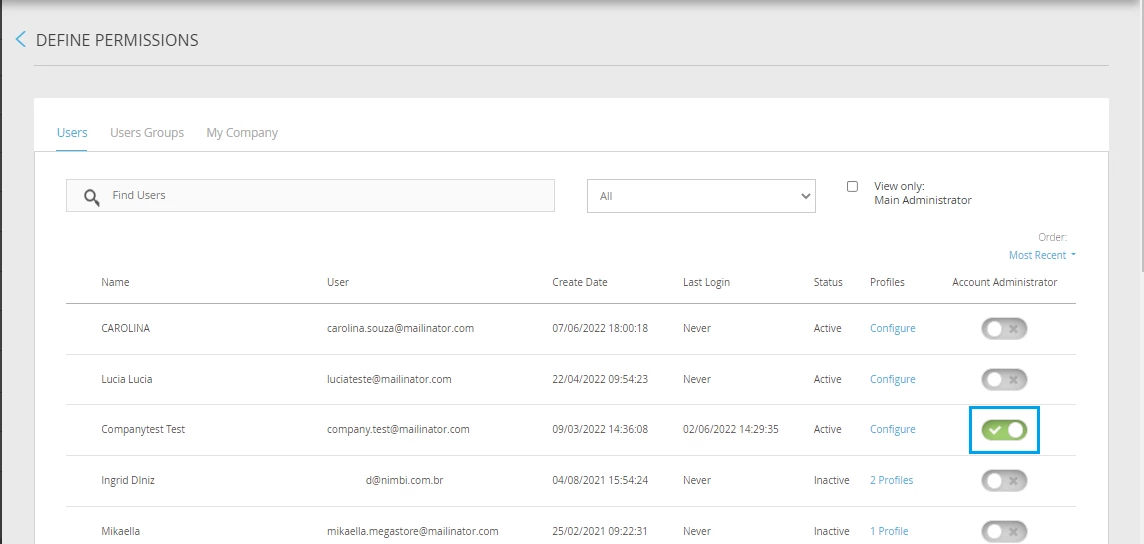 |
| Expand | ||
|---|---|---|
|
Here are the steps required to set an access time for the profile. Then go in Nimbi Network and click Users;  A Change Data screen will be displayed. To do this, click on the flag to enable the available fields. Then click save. 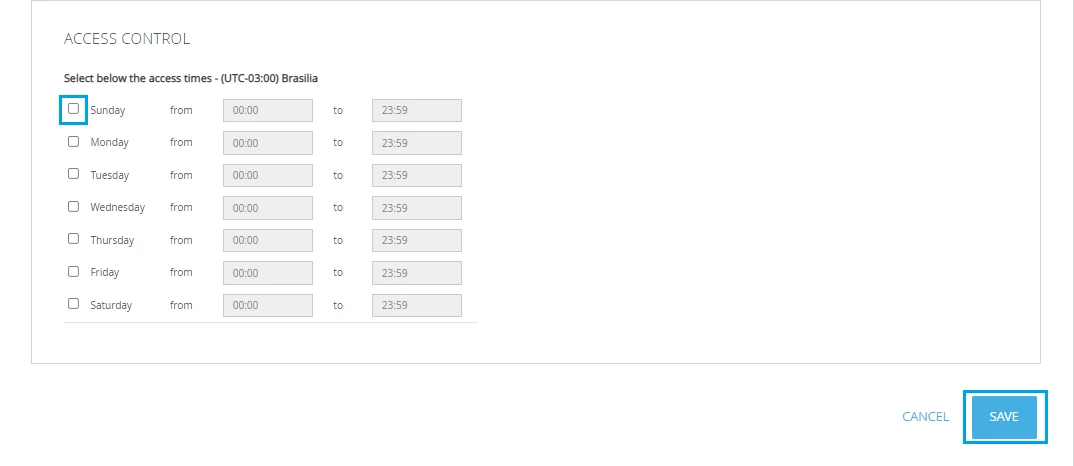 |
| Expand | ||
|---|---|---|
| ||
Here are the steps required to register multiple users from your company on Nimbi network. To add more than one user from your company to the Nimbi network, access the system and go to Settings > Nimbi Network and click Users.  To register multiple users users, select the users tab click Add > Multiple Users 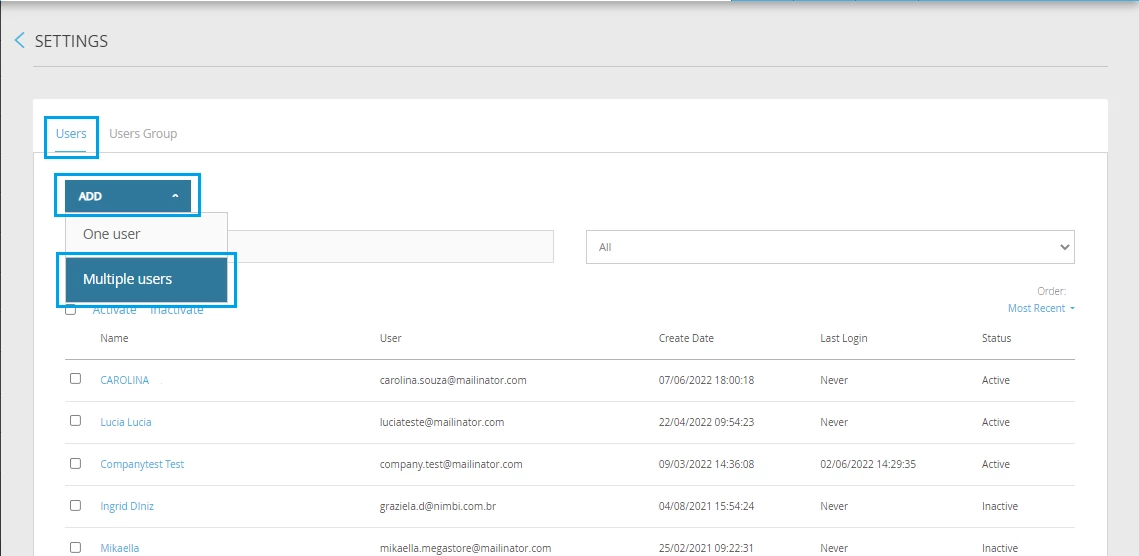 Then click Download Template to download the template, complete it and save the information.  In the Permissions panel, select which profiles the users that are inserted in the template can have access in each module.  Upload the completed template by clicking on the clips, then Attach. To finish, click Confirm.  The import process will start, and after it is finalized, you will receive a notification. |
| Expand | ||
|---|---|---|
|
To access the Participants List, you will have to access the system in Settings > Nimbi Network and click Users.  Go to the User Groups section, click Add and choose the Via interface option. 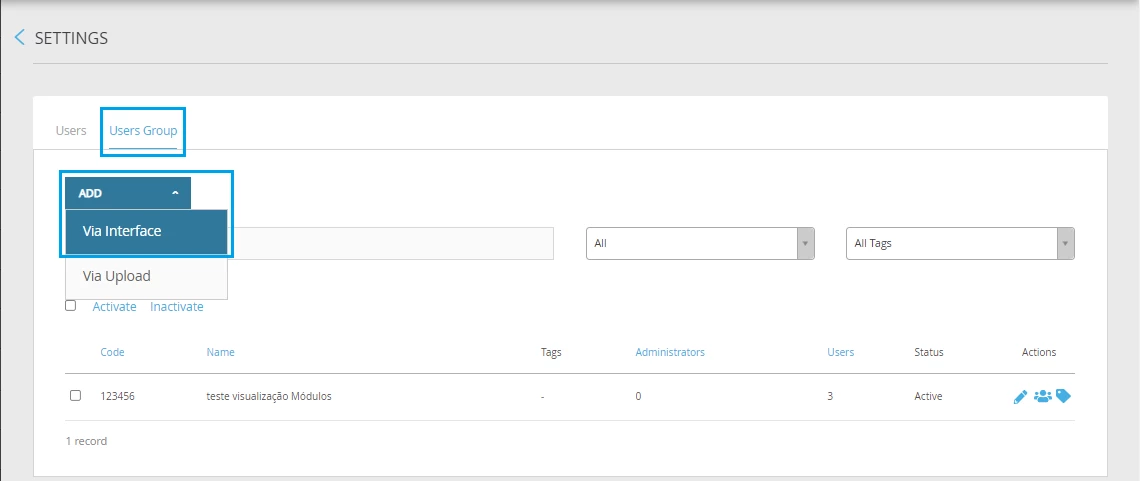 |
| Expand | ||
|---|---|---|
| ||
If you are the Master Administrator of your company's Nimbi account, you can change the password of other users if necessary. Enter the Nimbi Network with your login, and go to Settings > Nimbi Network > Users, and then select the user who needs to have the password reset.  If necessary, search for it using the Search.  The Modify data page will load, change any data you want. Scroll down to the Access Credentials panel and click the Reset Password button. 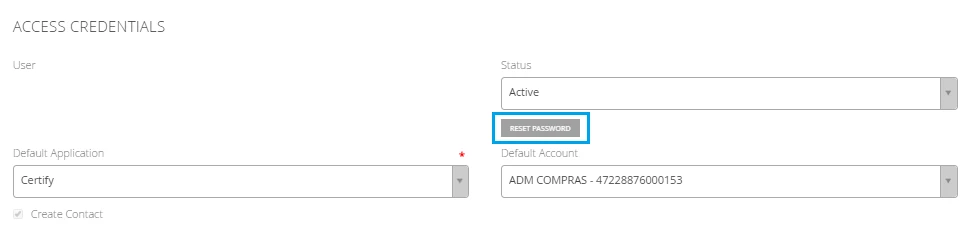 The Password Reset pop-up will appear for you to set a new password, according to the security rules presented. Click Redefine and you're done! The password of the user in question is already changed. 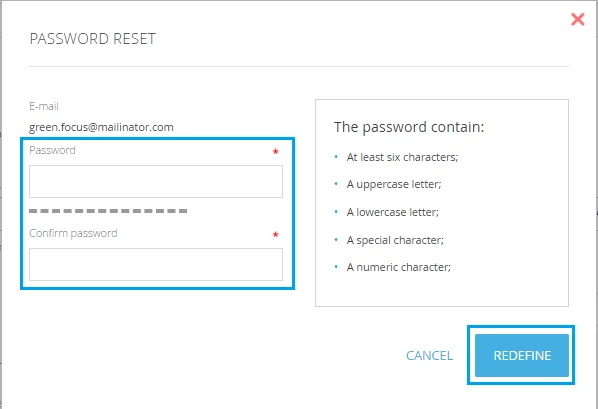 |
| Expand | ||
|---|---|---|
| ||
There are two ways to accept a unified access request. 1 By e-mail: Access the email address registered in your users; Locate the unification notification message sent by Nimbi; Click on 'Access here';  Point to the check box of the company you wish to approve; Click on 'Confirm';  At the end of the process, it will be possible to change the company (Fiscal Number) to which the respective user accesses by clicking on the name of his company, located on the upper right side of the screen. Then click on the icon of the desired company. 2.Directly through the portal (Nimbi Network): Access the portal with your credentials (login and password);  |
| Status | ||||||
|---|---|---|---|---|---|---|
|
- How to create an approval hierarchy?
- How to create a Plant?
- How to enable Two-Step access Authentication?
- Set invitation token expiration
- Add Nature of Operation on Value List Settings
- How do I set up my company's Cost Allocation?
| Status | ||||||
|---|---|---|---|---|---|---|
|
|
| Expand | ||
|---|---|---|
| ||
Access our site at www.nimbi.com.br then click on Login; 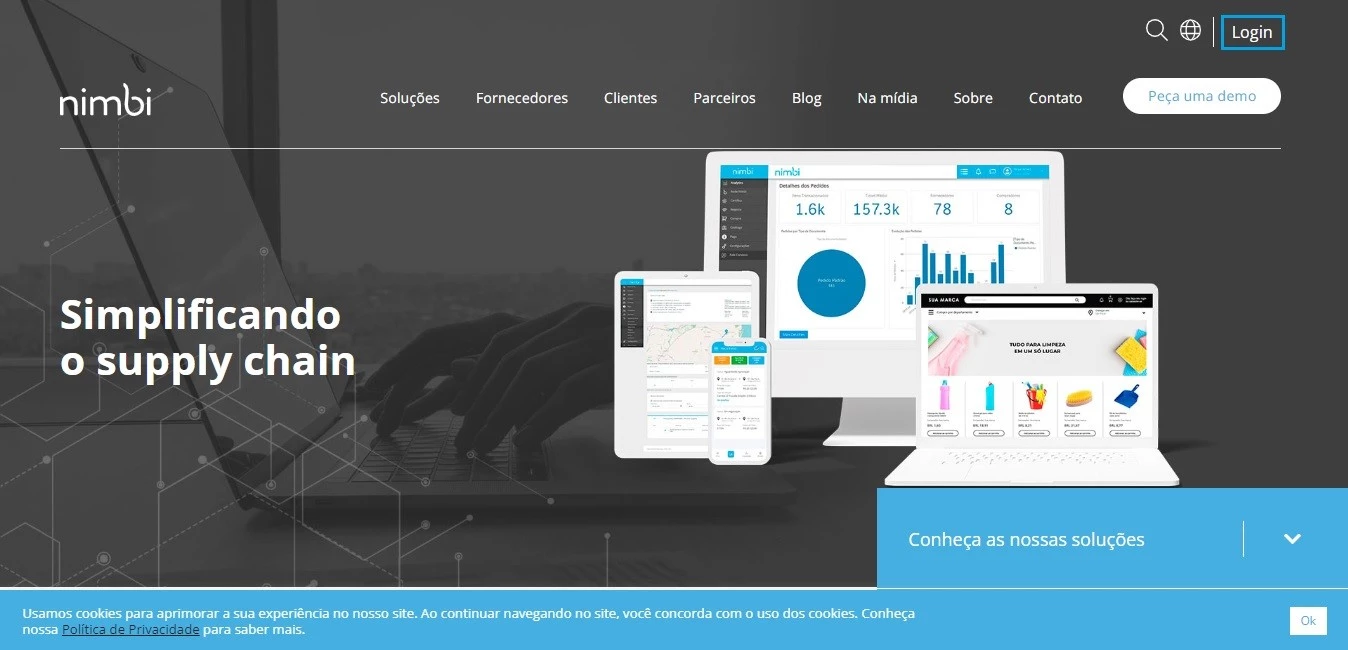 You navigation will be redirected to the login page, click on Don’t have an account?, Create one now;  Fill out the requested fields as shown below:
 Fill in your Name and e-mail; Click on Request Access; The administrator, who is responsible for registering your company on Nimbi Network, will receive a notification regarding your request for access to the portal. 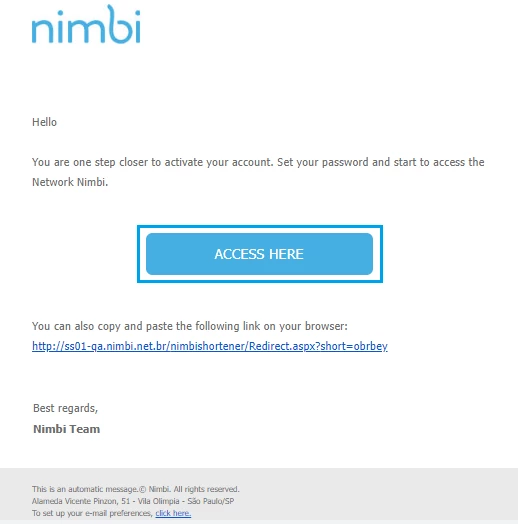 Navigation will be redirected to the account activation page where it is necessary to fill in the Password. Password Confirmation fields according to the criteria below;
After setting your access password, click Activate Account. 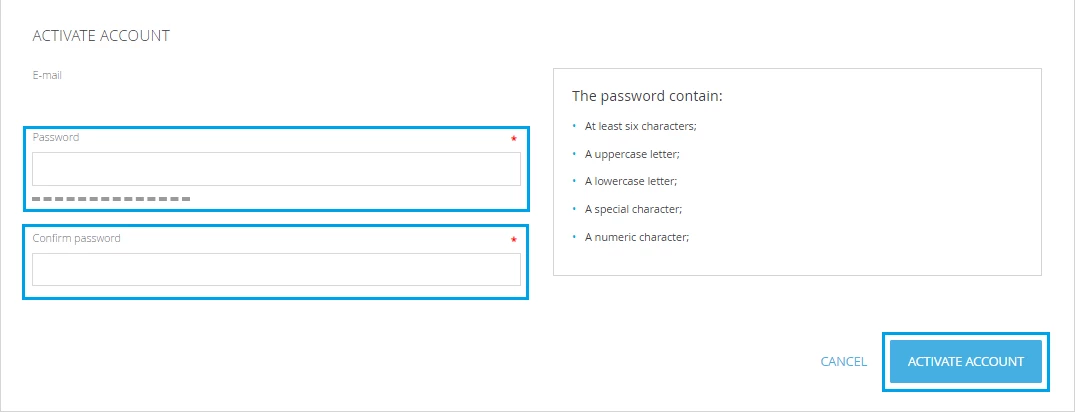 Ready! It is now possible to access your company's registration in the portal. |
| Expand | ||
|---|---|---|
| ||
To add a user to your company on the Nimbi Network is very easy. Access the system and go to Settings > Users. 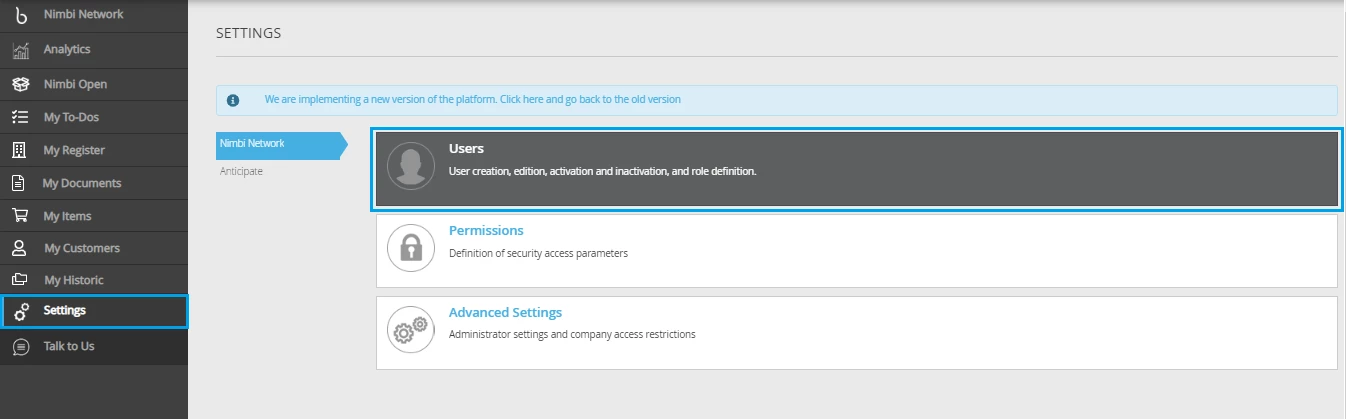 To register a new user, go to the Users section, click Add and choose the One User option. 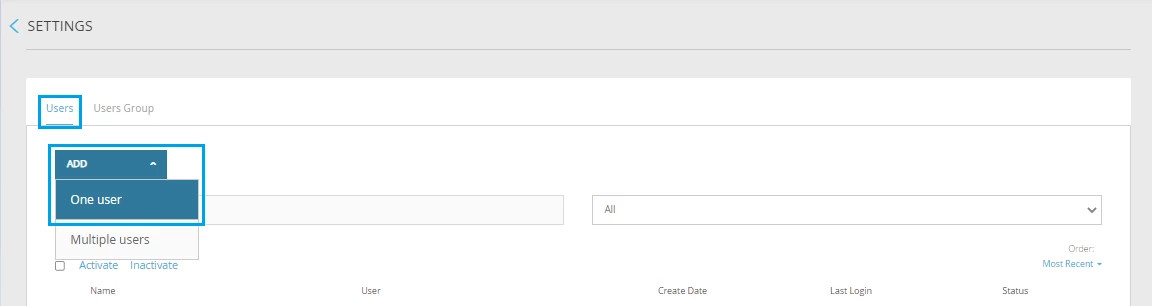 Select a profile photo by clicking Change Profile Image;  In the Identification panel, fill in the required fields, marked with red start. They are:
 In the Access Credentials panel, in the field Standard Application, select the option Certify then click ADD. When you click Add, the system displays the registration message successfully and the user will be registered in the user list for the company. 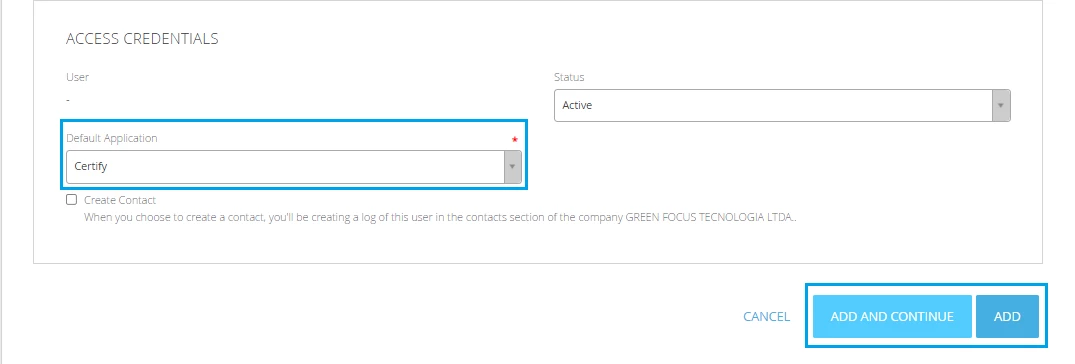 After creating the user, you need to define what will be his/her permission in the system. To do this, go to the Permissions option. Click Settings, in the profile configuration screen, select the profile that this user needs to have in the system, and click save to store the selected information. 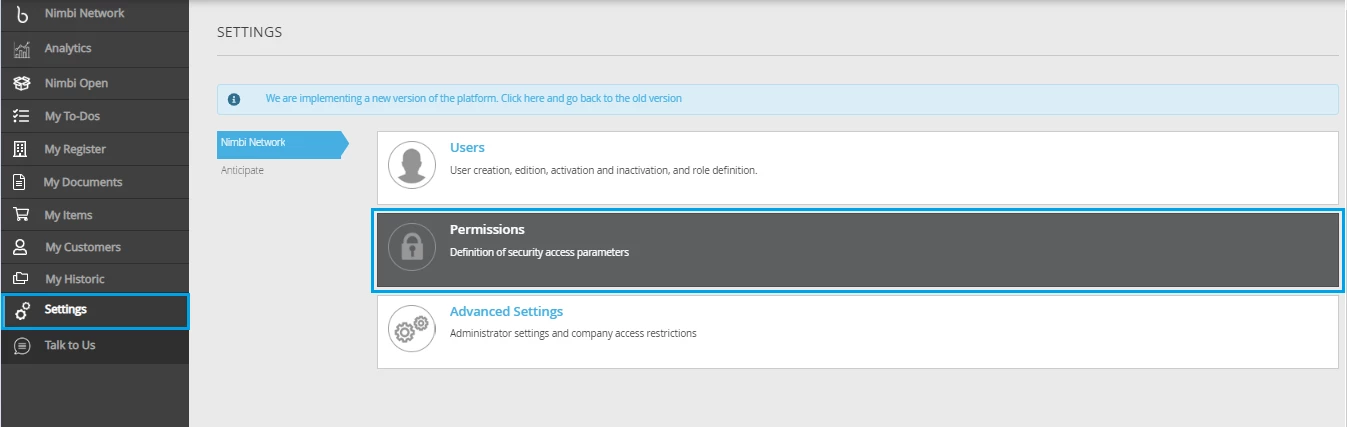 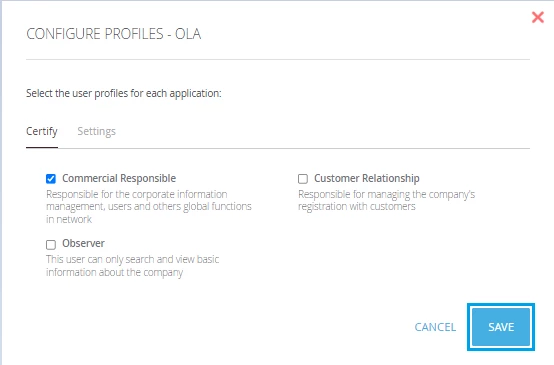 When you click save, the system displays the setup message successfully saved, and in the Profiles column you can see which profiles the user is associated. 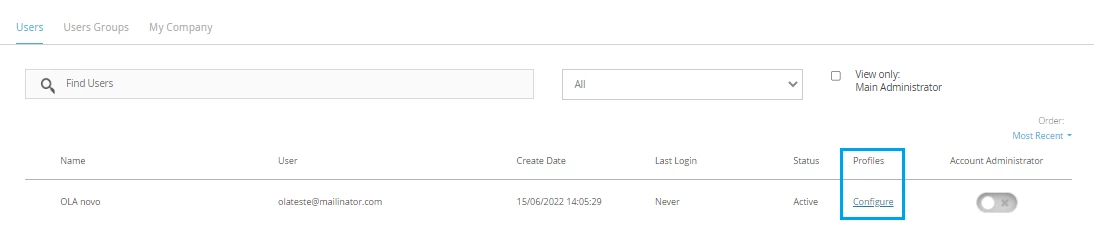 |
| Expand | ||
|---|---|---|
| ||
Access the Portal with your login and password and navigate to the Settings menu. On Nimbi Network, click Permissions to set Administrator settings. 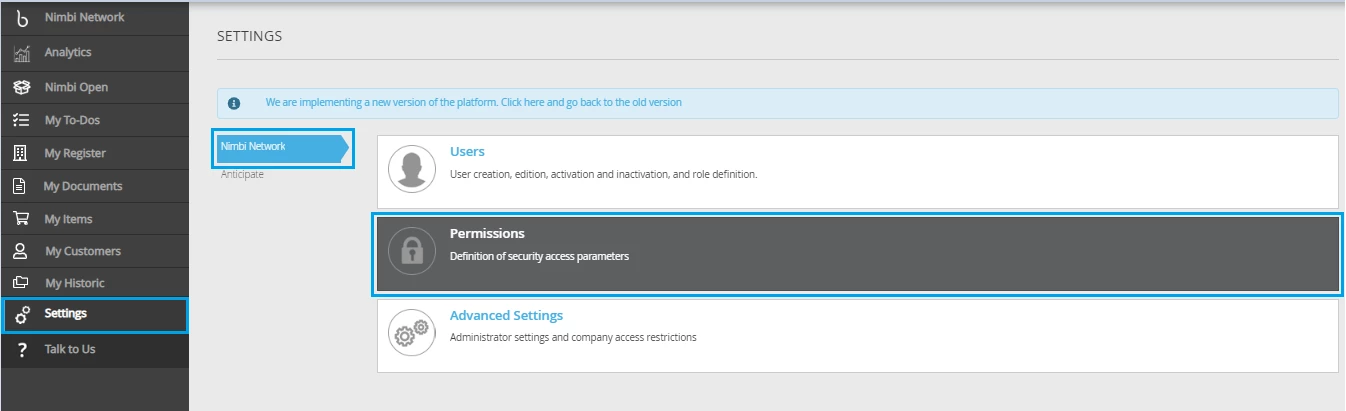 Important: By granting the permission, the user can answer negotiations and edit the company registration. In the Users tab, select which user gets to the role of Principal Administrator. Remember that it is now possible to delegate more than one user to the account administrator role. Thus, all administrators will be responsible for receiving all notifications, pending and emails intended for this user. 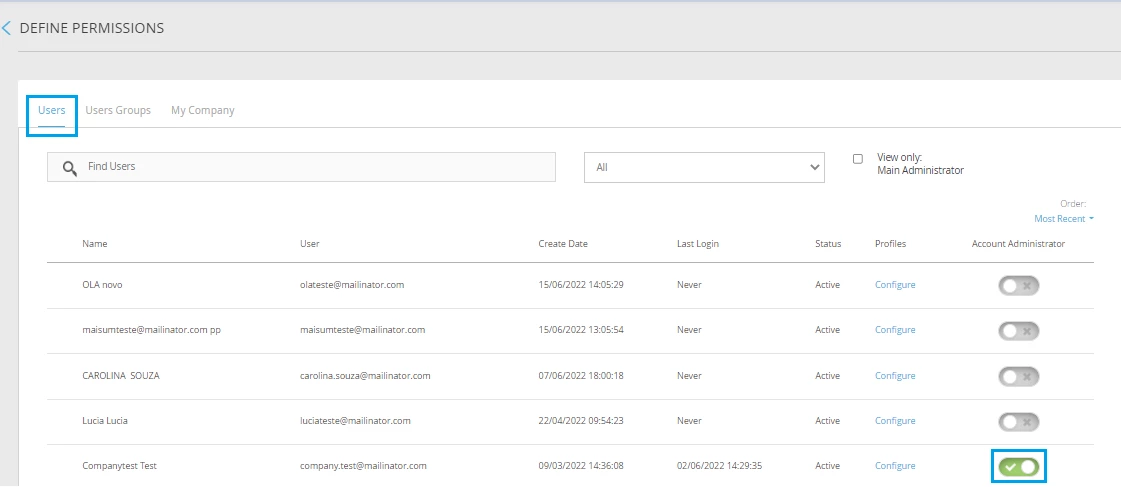 |
| Expand | ||
|---|---|---|
| ||
If you are your company's account administrator, access the system and go to Settings. Then go in Nimbi Network and click Users.- Click the user name link you want to make the change of the access time. 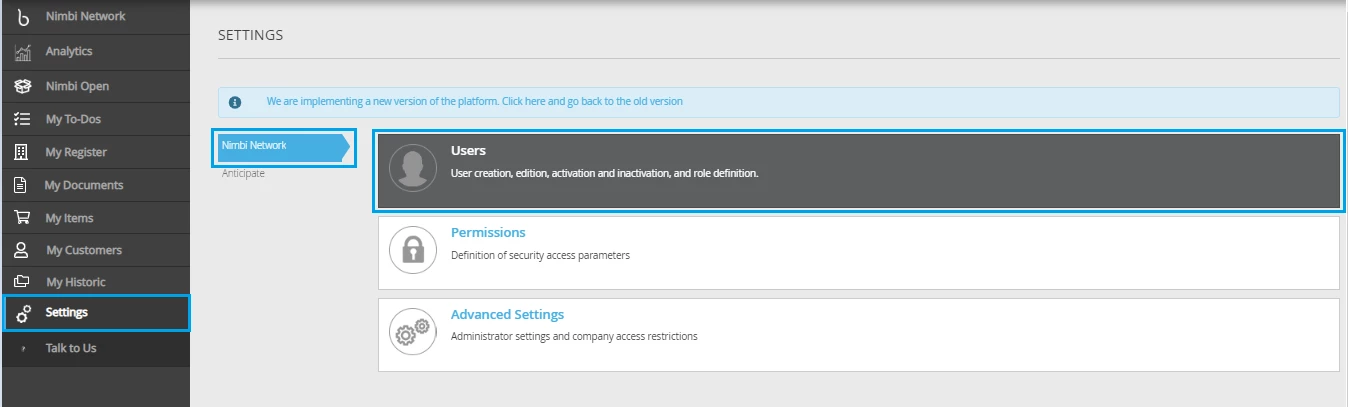 Click the user name link you want to make the change of the access time; 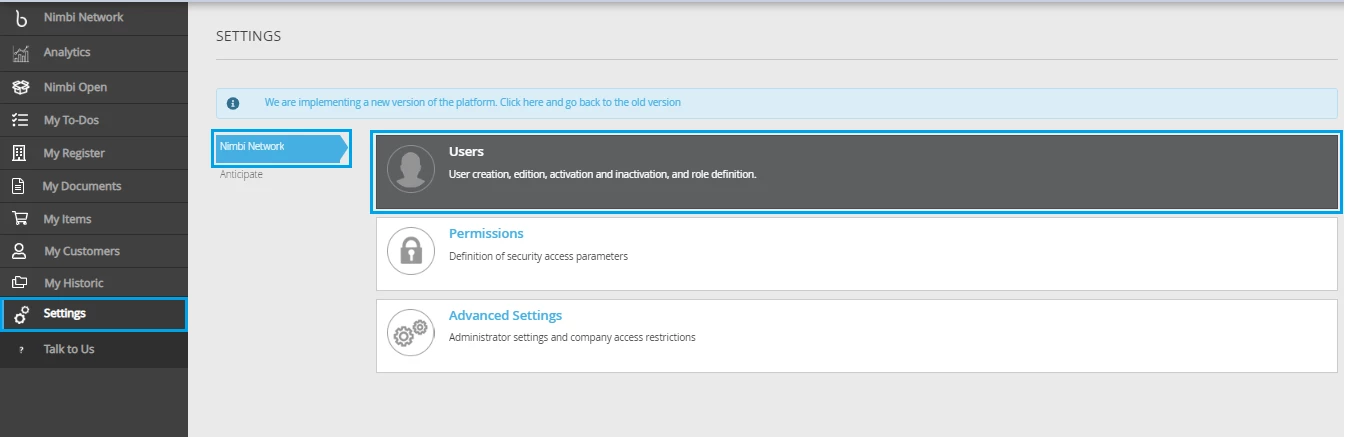 A Change Data screen will be displayed. 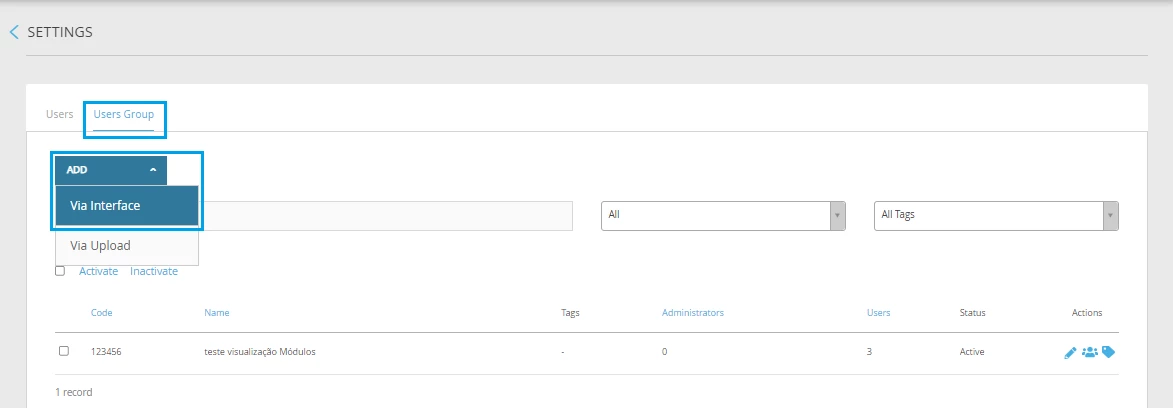 |
| Expand | ||
|---|---|---|
| ||
To add more than one user from your company to the Nimbi network, access the system and go to Settings > Nimbi Network and click Users. 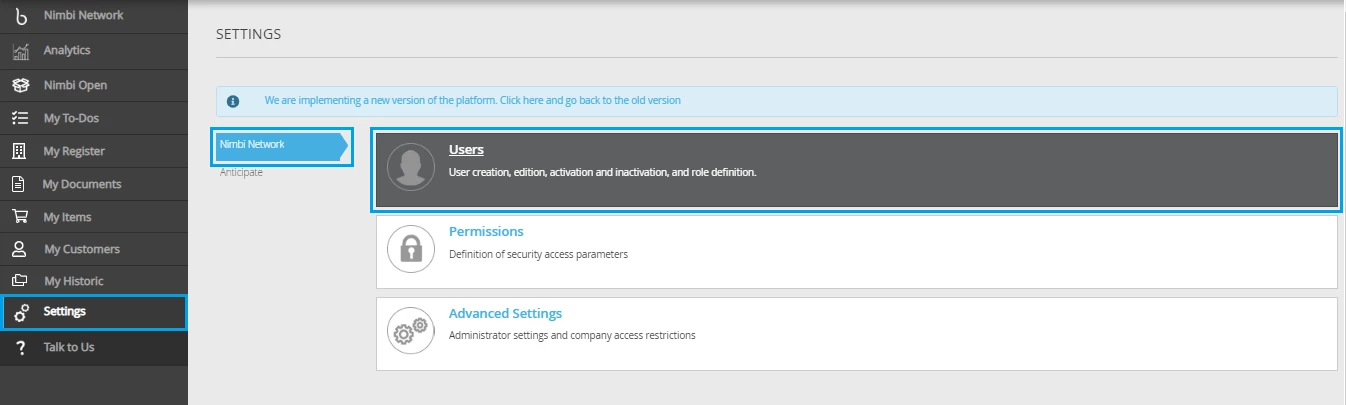 To register multiple users users, select the users tab click > Add > Multiple Users 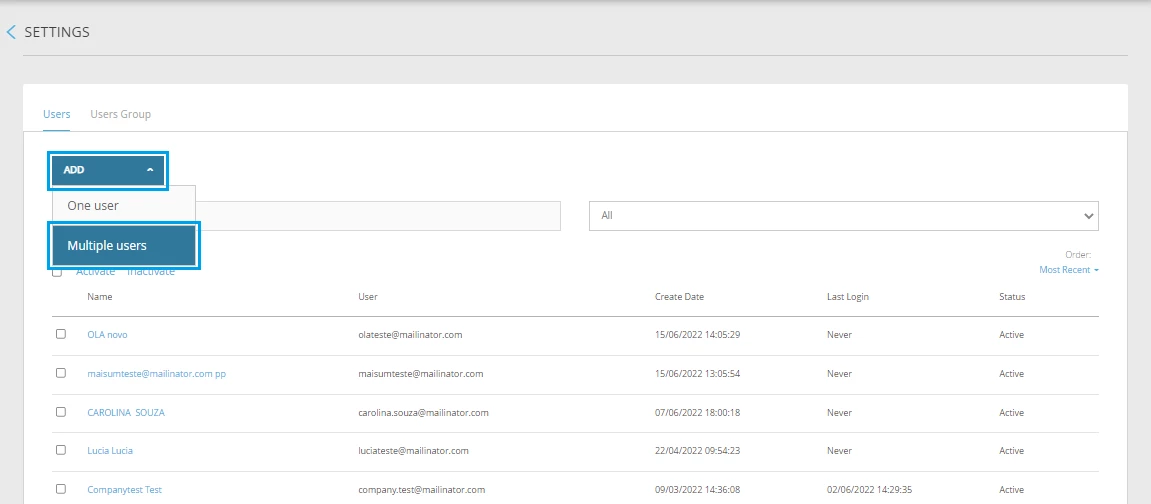 Then click Download Template to download the template, complete it and save the information; 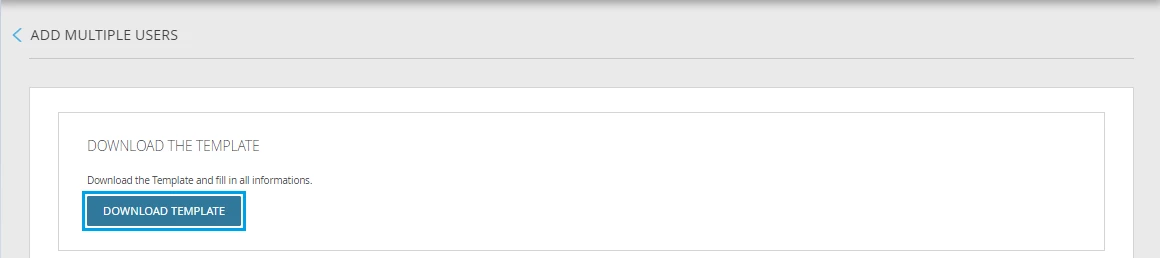 In the Permissions panel, select which profiles the users that are inserted in the template can have access in each module. 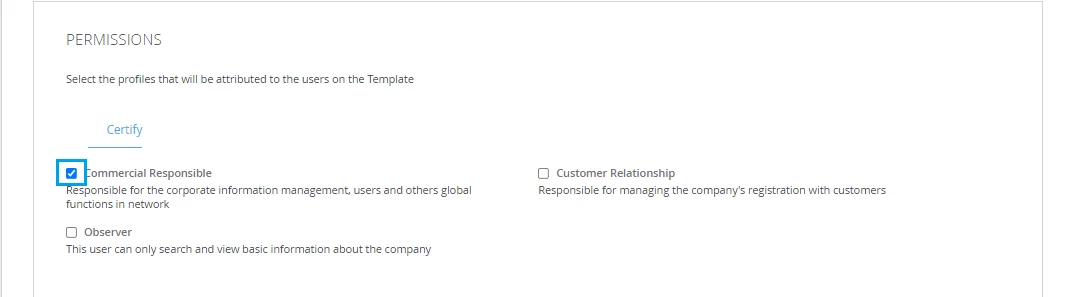 Upload the completed template by clicking on the clips, then Attach. To finish, click Confirm.  The import process will start, and after it is finalized, you will receive a notification. |
| Expand | ||
|---|---|---|
| ||
To access the Participants List, you will have to access the system in Settings > Nimbi Network and click Users; Go to the Users Group section, click Add and choose the Via interface option. |
| Expand | ||
|---|---|---|
| ||
If you are the Master Administrator of your company's Nimbi account, you can change the password of other users if necessary. Enter the Nimbi Network with your login, and go to Settings > Nimbi Network > Users, and then select the user who needs to have the password reset; 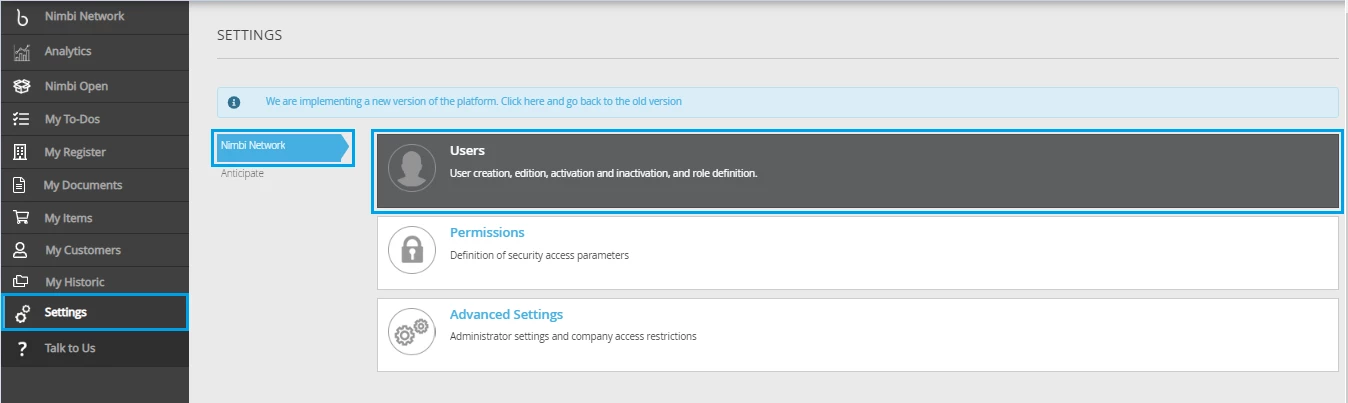 If necessary, search for it using the Search.  The Modify data page will load, change any data you want. Scroll down to the Access Credentials panel and click the Reset Password button. 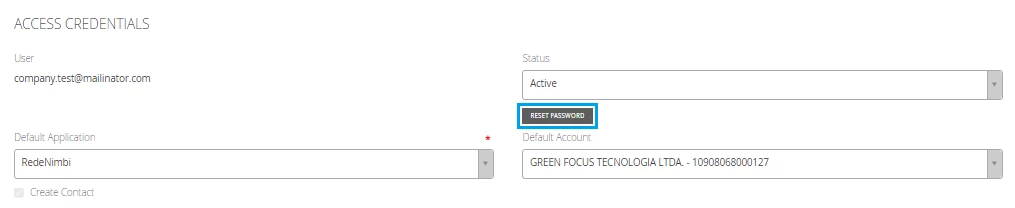 The Password Reset pop-up will appear for you to set a new password, according to the security rules presented. Click Redefine and you're done! The password of the user in question is already changed.  |
| Expand | ||
|---|---|---|
| ||
There are two ways to accept a unified access request. 1 By e-mail : Access the email address registered in your users; Locate the unification notification message sent by Nimbi; Click on 'Access here'; 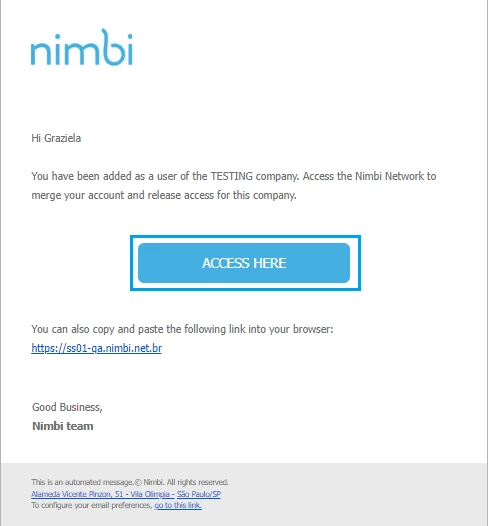 Point to the check box of the company you wish to approve; Click on 'Confirm'; 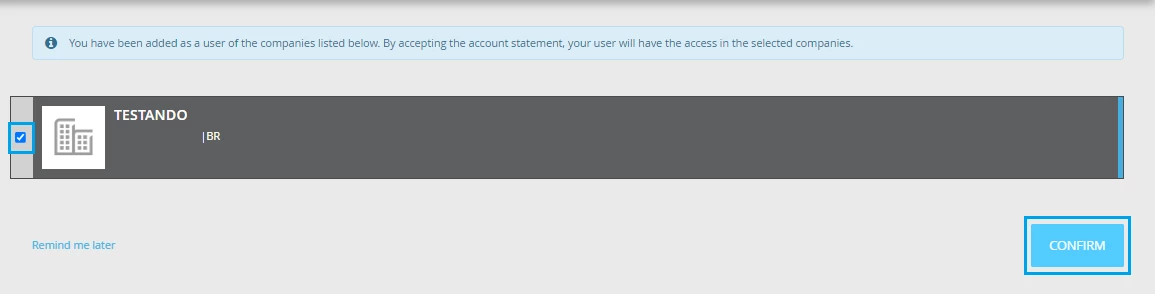 At the end of the process, it will be possible to change the company (Fiscal Number) to which the respective user accesses by clicking on the name of his company, located on the upper right side of the screen. Then click on the icon of the desired company. 2.Directly through the portal (Nimbi Network): Access the portal with your credentials (login and password);  |